21 Feb 2019
So recently I have been playing around with my Deep Learning environments trying to optimise the BLAS (Basic Linear Algebra Subprograms) libraries as much as possible since I plan on using it for computer vision ML models that require efficient computations as images are extracted from video streams. That’s when I first came across the Intel Math Kernel Library (MKL) that can be used to improve the efficiency of numpy, scipy, tensorflow, and opencv. Additionally, reading this post helped me better understand how boosting BLAS was going to help with my deep learning models.
One of the first things you are going to need to do is register for a student account with Intel so you can download the Intel Parallel Studio XE pack. If you aren’t a student, you can still download Intel MKL as they have made it free. The only difference between these two packages is that Parallel Studio XE will allow you to install other optimised libraries such as OpenMP, TBB, and IPP.
Pre-installation Steps
Firstly, my system has an NVIDIA 2080 Ti. I have already installed CUDA 10.0 with TensorRT 5.0.2 and cuDNN 7.4.2. If you have not done this, read my post from 27.12.2018 to install them.
Additionally, other packages you might need for OpenCV to work best, you can install the following:
$ sudo apt update
$ sudo apt install build-essential cmake unzip pkg-config pylint \
libjpeg-dev libpng-dev libtiff-dev libavcodec-dev libavformat-dev \
libdc1394-22-dev libx264-dev libswscale-dev libv4l-dev \
libxvidcore-dev libx264-dev libeigen3-dev gfortran \
libhdf5-serial-dev python3-dev python3-tk python-imaging-tk \
ubuntu-restricted-extras libgtk-3-dev libgstreamer1.0-dev \
libgstreamer-plugins-base1.0-dev libavresample-dev libgflags2.2 \
libgflags-dev libgoogle-glog-dev
Another dependency required by OpenCV that is not available in the aptrepository with Ubuntu 18.04 is libjasper. To install, follow these manual steps:
$ wget http://security.ubuntu.com/ubuntu/pool/main/j/jasper/libjasper-dev_1.900.1-debian1-2.4ubuntu1.2_amd64.deb
$ wget http://security.ubuntu.com/ubuntu/pool/main/j/jasper/libjasper1_1.900.1-debian1-2.4ubuntu1.2_amd64.deb
$ sudo apt-get install ./libjasper1_1.900.1-debian1-2.4ubuntu1.2_amd64.deb \
  ./libjasper-dev_1.900.1-debian1-2.4ubuntu1.2_amd64.deb
Finally, there is another package we can install from Google developers that will support protocol buffers. We will do this from source to control our package.
$ sudo apt install -y autoconf automake libtool curl make g++ unzip
$ git clone https://github.com/google/protobuf.git
$ cd protobuf && git checkout v3.6.1
$ git submodule update --init --recursive
$ ./autogen.sh
$ ./configure
$ make -j$(nproc)
$ make -j$(nproc) check
$ sudo make install
$ sudo ldconfig
$ protoc --version
libprotoc 3.6.1
Install Intel MKL and (Optionally) Other Libraries
Once you have downloaded Intel Parallel Studio XE (it will take some time as it is a big ~4 GB file), you should create a folder to keep all these library source files. Unfortunately, as I have been testing the Intel MKL packages lately, I have been unable to make the new 2019.3 version to work with OpenCV 4.0.1 or 3.4.5. As a result, we are going to download the 2018 Update 4 version. Please ensure you do so as it may not work for you either. If you do manage to get the 2019 update to work, please send me an email as I would very much appreciate some help.
Download or move to this deep_learning_env directory and then do the following.
$ mkdir $HOME/deep_learning_env & cd deep_learning_env
$ tar -xzf parallel_studio_xe_2018_update4_cluster_edition.tgz
$ cd parallel_studio_xe_2018_update4_cluster_edition/
$ sudo ./install_GUI.sh
The GUI installation process will begin. Firstly accept the license agreement and decent if you want to join the Intel Software Improvement Program. After this you will enter your serial number that you received when you registered and downloaded the Intel Parallel Studio XE 2018 Update 4 Cluster Edition for Linux package.
After you have completed these stages, you will get to a screen like this. Ensure you select Customize…
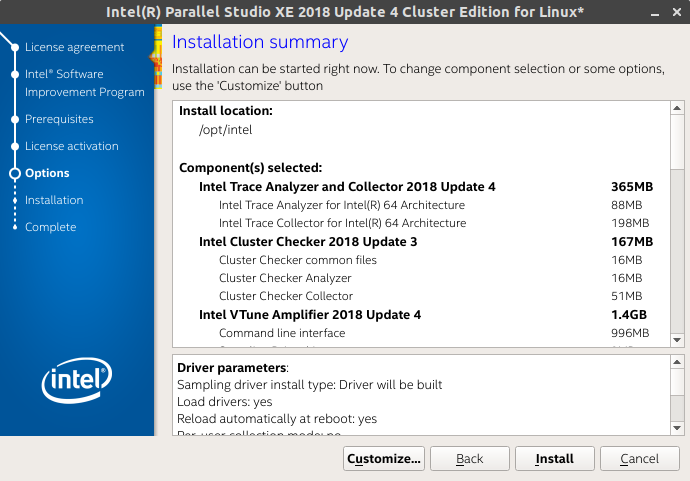
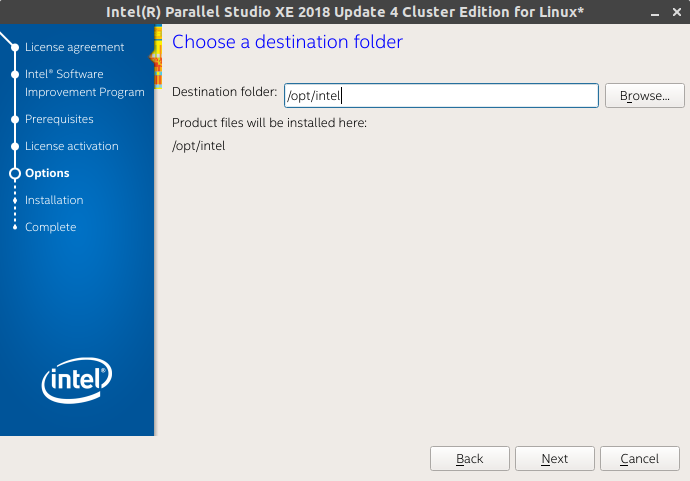
From here, you will install it. You can safely leave it as default to install in /opt/intel.
Finally, here is where you select the packages you will need.
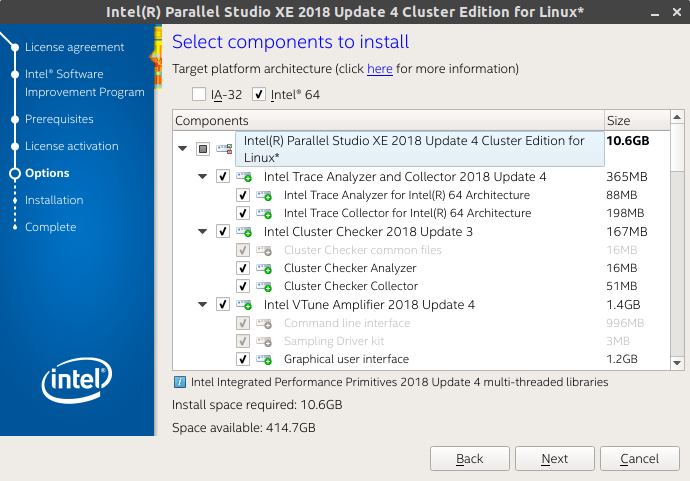
I generally left it as it is and installed the following (note: I have marked the important ones as **. You may not need to install the others):
Intel VTune Amplifier 2018 Update 4 **
Intel Inspector 2018 Update 4
Intel Advisor 2018 Update 4
Intel C++ Compiler 18.0 Update 5 **
Intel Fortran Compuler 18.0 Update 5 **
Intel Math Kernel Library 2018 Update 4 for C/C++ **
Intel Math Kernel Library 2018 Update 4 for Fortran **
Intel Integrated Performance Primitives 2018 Update 4 **
Intel Threading Building Blocks 2018 Update 6
Intel Data Analytics Acceleration Library 2018 Update 3
Intel MPI Library 2018 Update 4
GNU GDB 7.12
Once that has finished installing, you will need to set the variables using a script provided by the installation.
$ source /opt/intel/bin/compilervars.sh -arch intel64 -platform linux
$ echo $LD_LIBRARY_PATH
/opt/intel/compilers_and_libraries_2018.5.274/linux/compiler/lib/intel64:/opt/intel/compilers_and_libraries_2018.5.274/linux/compiler/lib/intel64_lin:/opt/intel/compilers_and_libraries_2018.5.274/linux/mpi/intel64/lib:/opt/intel/compilers_and_libraries_2018.5.274/linux/mpi/mic/lib:/opt/intel/compilers_and_libraries_2018.5.274/linux/ipp/lib/intel64:/opt/intel/compilers_and_libraries_2018.5.274/linux/compiler/lib/intel64_lin:/opt/intel/compilers_and_libraries_2018.5.274/linux/mkl/lib/intel64_lin:/opt/intel/compilers_and_libraries_2018.5.274/linux/tbb/lib/intel64/gcc4.7:/opt/intel/compilers_and_libraries_2018.5.274/linux/tbb/lib/intel64/gcc4.7:/opt/intel/debugger_2018/libipt/intel64/lib:/opt/intel/compilers_and_libraries_2018.5.274/linux/daal/lib/intel64_lin:/opt/intel/compilers_and_libraries_2018.5.274/linux/daal/../tbb/lib/intel64_lin/gcc4.4:/opt/intel/compilers_and_libraries/linux/mkl/lib/intel64:/opt/intel/compilers_and_libraries/linux/lib/intel64:/usr/local/cuda/lib64:/usr/local/cuda/extras/CUPTI/lib64:

$ echo $CPATH
/opt/intel/compilers_and_libraries_2018.5.274/linux/ipp/include:/opt/intel/compilers_and_libraries_2018.5.274/linux/mkl/include:/opt/intel/compilers_and_libraries_2018.5.274/linux/pstl/include:/opt/intel/compilers_and_libraries_2018.5.274/linux/tbb/include:/opt/intel/compilers_and_libraries_2018.5.274/linux/tbb/include:/opt/intel/compilers_and_libraries_2018.5.274/linux/daal/include
If you do not see the above in your LD_LIBRARY_PATH then there is a major issue and you may need to install again. Please note yours may be fewer in output because you may not have installed as many packages.
Using the Intel Distribution for Python
While it is fine to accelerate most data science libraries with just Intel MKL, to help achieve even faster performance on Intel chipsets, you can use the Intel Distribution for Python which can help even further with your optimisations. As I mentioned earlier, we have already installed it with our Intel Parallel Studio XE package.
I will probably make another post with this same build process using the Intel Distribution for Python version. However, for the mean time, I will just use the system Python that ships with Ubuntu 18.04.
$ which python3
/usr/bin/python3

$ python3 --version
Python 3.6.7
Using the Intel Distribution for Python with Conda
$ conda create -n intel_dl4cv intelpython python=3 -c intel
Collecting package metadata: done
Solving environment: done

## Package Plan ##

  environment location: /home/codeninja/anaconda3/envs/intel_dl4cv

  added / updated specs:
    - intelpython
    - python=3


The following packages will be downloaded:

    package                    |            build
    ---------------------------|-----------------
    bzip2-1.0.6                |               17          97 KB  intel
    certifi-2018.1.18          |           py36_2         143 KB  intel
    intelpython-2019.2         |                0           3 KB  intel
    openssl-1.0.2p             |                0         2.0 MB  intel
    pip-9.0.3                  |           py36_1         1.9 MB  intel
    python-3.6.8               |                0        24.3 MB  intel
    setuptools-39.0.1          |           py36_0         726 KB  intel
    sqlite-3.23.1              |                1         1.3 MB  intel
    tcl-8.6.4                  |               20         1.3 MB  intel
    tk-8.6.4                   |               28         1.1 MB  intel
    wheel-0.31.0               |           py36_3          62 KB  intel
    xz-5.2.3                   |                2         173 KB  intel
    zlib-1.2.11                |                5          95 KB  intel
    ------------------------------------------------------------
                                           Total:        33.2 MB
Installing Numpy and Scipy with Intel MKL
https://software.intel.com/en-us/articles/numpyscipy-with-intel-mkl
$ git clone https://github.com/numpy/numpy.git
$ git clone https://github.com/scipy/scipy.git
$ cd numpy && git checkout v1.16.1
$ cd ../scipy && git checkout v1.2.1
Numpy
NOTE: A recent bug that I have noticed when I previously installed numpy was an issue to do with using the Intel Fortran compiler after numpy had been installed and then trying to install scipy. This issue was noted here #10569 and then fixed #12831. As noted at the end of this, numpy version v1.16.0rc1 introduced this issue so we have we will use the latest release and apply the manual fix ourselves.
$ cd $HOME/deep_learning_env/numpy
$ nano numpy/distutils/ccompiler.py
Fix the following line to look like this:
...

try:
        output = subprocess.check_output(version_cmd, stderr=subprocess.STDOUT)

...
In addition to that, we will add some C/C++ compiler flags in this file numpy/distutils/intelccompiler.py that Intel has suggested from this tutorial. Note, we are really only adding -xhost to the following line self.cc_exe = ('icc -m64 -fPIC -fp-model strict -O3 -fomit-frame-pointer -xhost -{}').format(mpopt) for the IntelEM64TCCompiler as can be seen below
class IntelEM64TCCompiler(UnixCCompiler):
    """
    A modified Intel x86_64 compiler compatible with a 64bit GCC-built Python.
    """
    compiler_type = 'intelem'
    cc_exe = 'icc -m64'
    cc_args = '-fPIC'

    def __init__(self, verbose=0, dry_run=0, force=0):
        UnixCCompiler.__init__(self, verbose, dry_run, force)

        v = self.get_version()
        mpopt = 'openmp' if v and v < '15' else 'qopenmp'
        self.cc_exe = ('icc -m64 -fPIC -fp-model strict -O3 '
                       '-fomit-frame-pointer -{}').format(mpopt)
        compiler = self.cc_exe
Finally, we are going to add the following to numpy/distutils/fcompiler/intel.py for the Intel Fortran compiler flags. Again, we are only adding -xhost to this line return ['-xhost -fp-model strict -fPIC -{}'.format(mpopt)] for the IntelFCompiler as can be seen below:
class IntelFCompiler(BaseIntelFCompiler):

    compiler_type = 'intel'
    compiler_aliases = ('ifort',)
    description = 'Intel Fortran Compiler for 32-bit apps'
    version_match = intel_version_match('32-bit|IA-32')

    possible_executables = ['ifort', 'ifc']

    executables = {
        'version_cmd'  : None,          # set by update_executables
        'compiler_f77' : [None, "-72", "-w90", "-w95"],
        'compiler_f90' : [None],
        'compiler_fix' : [None, "-FI"],
        'linker_so'    : ["<F90>", "-shared"],
        'archiver'     : ["ar", "-cr"],
        'ranlib'       : ["ranlib"]
        }

    pic_flags = ['-fPIC']
    module_dir_switch = '-module '  # Don't remove ending space!
    module_include_switch = '-I'

    def get_flags_free(self):
        return ['-FR']

    def get_flags(self):
        return ['-fPIC']

    def get_flags_opt(self):  # Scipy test failures with -O2
        v = self.get_version()
        mpopt = 'openmp' if v and v < '15' else 'qopenmp'
        return ['-xhost -fp-model strict -O1 -{}'.format(mpopt)]
Now we can setup to compile numpy:
$ cp site.cfg.example site.cfg
$ nano site.cfg
Uncomment the following lines in the file the following assuming your installation path of Intel MKL is at /opt/intel/compilers_and_libraries_2018/linux:
# MKL
#----
# Intel MKL is Intel's very optimized yet proprietary implementation of BLAS and
# Lapack. Find the latest info on building numpy with Intel MKL in this article:
# https://software.intel.com/en-us/articles/numpyscipy-with-intel-mkl
# Assuming you installed the mkl in /opt/intel/compilers_and_libraries_2018/linux/mkl,
# for 64 bits code at Linux:

[mkl]
library_dirs = /opt/intel/compilers_and_libraries_2018/linux/mkl/lib/intel64
include_dirs = /opt/intel/compilers_and_libraries_2018/linux/mkl/include
mkl_libs = mkl_rt
lapack_libs =
Finally, we are going to build our numpy installation:
$ python3 setup.py config --compiler=intelem build_clib --compiler=intelem build_ext --compiler=intelem install --user
To test if you have installed it correctly linked with Intel MKL, use the following:
$ cd ~/
$ python3 -c "import numpy as np; np.__config__.show()"
blas_mkl_info:
    libraries = ['mkl_rt', 'pthread']
    library_dirs = ['/opt/intel/compilers_and_libraries_2018/linux/mkl/lib/intel64']
    define_macros = [('SCIPY_MKL_H', None), ('HAVE_CBLAS', None)]
    include_dirs = ['/opt/intel/compilers_and_libraries_2018.5.274/linux/mkl', '/opt/intel/compilers_and_libraries_2018.5.274/linux/mkl/include', '/opt/intel/compilers_and_libraries_2018.5.274/linux/mkl/lib', '/opt/intel/compilers_and_libraries_2018/linux/mkl/include']
blas_opt_info:
    libraries = ['mkl_rt', 'pthread']
    library_dirs = ['/opt/intel/compilers_and_libraries_2018/linux/mkl/lib/intel64']
    define_macros = [('SCIPY_MKL_H', None), ('HAVE_CBLAS', None)]
    include_dirs = ['/opt/intel/compilers_and_libraries_2018.5.274/linux/mkl', '/opt/intel/compilers_and_libraries_2018.5.274/linux/mkl/include', '/opt/intel/compilers_and_libraries_2018.5.274/linux/mkl/lib', '/opt/intel/compilers_and_libraries_2018/linux/mkl/include']
lapack_mkl_info:
    libraries = ['mkl_rt', 'pthread']
    library_dirs = ['/opt/intel/compilers_and_libraries_2018/linux/mkl/lib/intel64']
    define_macros = [('SCIPY_MKL_H', None), ('HAVE_CBLAS', None)]
    include_dirs = ['/opt/intel/compilers_and_libraries_2018.5.274/linux/mkl', '/opt/intel/compilers_and_libraries_2018.5.274/linux/mkl/include', '/opt/intel/compilers_and_libraries_2018.5.274/linux/mkl/lib', '/opt/intel/compilers_and_libraries_2018/linux/mkl/include']
lapack_opt_info:
    libraries = ['mkl_rt', 'pthread']
    library_dirs = ['/opt/intel/compilers_and_libraries_2018/linux/mkl/lib/intel64']
    define_macros = [('SCIPY_MKL_H', None), ('HAVE_CBLAS', None)]
    include_dirs = ['/opt/intel/compilers_and_libraries_2018.5.274/linux/mkl', '/opt/intel/compilers_and_libraries_2018.5.274/linux/mkl/include', '/opt/intel/compilers_and_libraries_2018.5.274/linux/mkl/lib', '/opt/intel/compilers_and_libraries_2018/linux/mkl/include']
Scipy
The installation for scipy is a little simpler as we are not required to fix any issues. However, if you get errors during this process, it is likely you did not compile numpy properly.
$ cd $HOME/deep_learning_env/scipy
$ python3 setup.py config --compiler=intelem --fcompiler=intelem build_clib --compiler=intelem --fcompiler=intelem build_ext --compiler=intelem --fcompiler=intelem install --user
Let’s just do a quick test.
$ cd ~/
# pip3 install pytest
$ python3
Python 3.6.7 (default, Oct 22 2018, 11:32:17)
[GCC 8.2.0] on linux
Type "help", "copyright", "credits" or "license" for more information.
>>> import scipy as sp
>>> sp.test(verbose=3)
================= test session starts ===============================
platform linux -- Python 3.6.7, pytest-4.3.0, py-1.7.0, pluggy-0.8.1 -- /usr/bin/python3
cachedir: .pytest_cache
rootdir: /home/codeninja/deep_learning_env/scipy, inifile: pytest.ini
collected 16700 items / 1223 deselected / 15477 selected
After all this is done, we are just going to add the following to our environment variables in $HOME/.bashrc.
##### INTEL MKL ######
export INTEL_COMPILERS_AND_LIBS=/opt/intel/compilers_and_libraries_2018/linux
export LD_LIBRARY_PATH=$INTEL_COMPILERS_AND_LIBS/mkl/lib/intel64:$INTEL_COMPILERS_AND_LIBS/lib/intel64:$LD_LIBRARY_PATH
export PATH=/opt/intel/bin:$PATH
Installing OpenCV 4 from source with Intel MKL
$ mkdir opencv_install && cd opencv_install
$ git clone https://github.com/opencv/opencv.git
$ git clone https://github.com/opencv/opencv_contrib.git
$ cd opencv; git checkout 4.0.1
$ cd ../opencv_contrib; git checkout 4.0.1
$ cd .. && nano xcmake.sh
Add the following to the file, assuming you have followed the steps from above as some of these will use specific library path setting:
#!/bin/bash

WHERE_OPENCV=../opencv
WHERE_OPENCV_CONTRIB=../opencv_contrib
# Run this first
# export LD_PRELOAD=/opt/intel/compilers_and_libraries_2018/linux/mkl/lib/intel64/libmkl_core.so

cmake -D CMAKE_BUILD_TYPE=RELEASE \
      -D CMAKE_INSTALL_PREFIX=/usr/local \
      -D PYTHON3_EXECUTABLE=/usr/bin/python3.6 \
      -D BUILD_OPENCV_PYTHON3=ON \
      -D INSTALL_C_EXAMPLES=ON \
      -D INSTALL_PYTHON_EXAMPLES=ON \
      -D WITH_STREAMER=ON \
      -D WITH_CUDA=ON \
      -D BUILD_opencv_gpu=ON \
      -D WITH_CUBLAS=1 \
      -D CUDA_FAST_MATH=1 \
      -D ENABLE_FAST_MATH=1 \
      -D WITH_IPP=ON \
      -D IPPROOT=/opt/intel/compilers_and_libraries_2018/linux/ipp \
      -D WITH_TBB=OFF \
      -D WITH_OPENMP=OFF \
      -D BUILD_PERF_TESTS=OFF \
      -D WITH_OPENCL=ON \
      -D WITH_OPENGL=ON \
      -D BUILD_opencv_dnn=OFF \
      -D BUILD_opencv_cudacodec=OFF \
      -D OPENCV_ENABLE_NONFREE=ON \
      -D WITH_PROTOBUF=ON \
      -D BUILD_PROTOBUF=OFF \
      -D PROTOBUF_INCLUDE_DIR=/usr/local/include \
      -D PROTOBUF_LIBRARY=/usr/local/lib/libprotobuf.so \
      -D PROTOBUF_LIBRARY_DEBUG=/usr/local/lib/libprotobuf.so \
      -D PROTOBUF_LITE_LIBRARY=/usr/local/lib/libprotobuf-lite.so \
      -D PROTOBUF_LITE_LIBRARY_DEBUG=/usr/local/lib/libprotobuf-lite.so \
      -D PROTOBUF_PROTOC_EXECUTABLE=/usr/local/bin/protoc \
      -D PROTOBUF_PROTOC_LIBRARY=/usr/local/lib/libprotoc.so \
      -D PROTOBUF_PROTOC_LIBRARY_DEBUG=/usr/local/lib/libprotoc.so \
      -D OPENCV_EXTRA_MODULES_PATH=$WHERE_OPENCV_CONTRIB/modules \
      -D BUILD_EXAMPLES=ON $WHERE_OPENCV
Then we are going to setup make files in a separate build directory:
$ sudo chmod u+x xcmake.sh
$ mkdir build && cd build
$ ../xcmake.sh
If you see the following then you are set to go:
--   Parallel framework:            pthreads
--
--   Trace:                         YES (with Intel ITT)
--
--   Other third-party libraries:
--     Intel IPP:                   2018.0.4 [2018.0.4]
--            at:                   /opt/intel/compilers_and_libraries_2018/linux/ipp
--        linked:                   static
--     Intel IPP IW:                sources (2019.0.0)
--               at:                /home/codeninja/deep_learning_env/ocv_install/build/3rdparty/ippicv/ippicv_lnx/iw/
--     Lapack:                      YES (/opt/intel/compilers_and_libraries_2018.5.274/linux/mkl/lib/intel64/libmkl_intel_lp64.so /opt/intel/compilers_and_libraries_2018.5.274/linux/mkl/lib/intel64/libmkl_sequential.so /opt/intel/compilers_and_libraries_2018.5.274/linux/mkl/lib/intel64/libmkl_core.so /opt/intel/compilers_and_libraries_2018.5.274/linux/mkl/lib/intel64/libmkl_intel_lp64.so /opt/intel/compilers_and_libraries_2018.5.274/linux/mkl/lib/intel64/libmkl_sequential.so /opt/intel/compilers_and_libraries_2018.5.274/linux/mkl/lib/intel64/libmkl_core.so /opt/intel/compilers_and_libraries_2018.5.274/linux/mkl/lib/intel64/libmkl_intel_lp64.so /opt/intel/compilers_and_libraries_2018.5.274/linux/mkl/lib/intel64/libmkl_sequential.so /opt/intel/compilers_and_libraries_2018.5.274/linux/mkl/lib/intel64/libmkl_core.so -lpthread -lm -ldl)
--     Eigen:                       YES (ver 3.3.4)
--     Custom HAL:                  NO
--     Protobuf:                    /usr/local/lib/libprotobuf.so (3.6.1)
--
--   NVIDIA CUDA:                   YES (ver 10.0, CUFFT CUBLAS NVCUVID FAST_MATH)
--     NVIDIA GPU arch:             30 35 37 50 52 60 61 70 75
--     NVIDIA PTX archs:
--
--   OpenCL:                        YES (no extra features)
--     Include path:                /home/codeninja/deep_learning_env/ocv_install/opencv/3rdparty/include/opencl/1.2
--     Link libraries:              Dynamic load
--
--   Python 3:
--     Interpreter:                 /usr/bin/python3.6 (ver 3.6.7)
--     Libraries:                   /usr/lib/x86_64-linux-gnu/libpython3.6m.so (ver 3.6.7)
--     numpy:                       /home/codeninja/.local/lib/python3.6/site-packages/numpy-1.16.1-py3.6-linux-x86_64.egg/numpy/core/include (ver 1.16.1)
--     install path:                lib/python3.6/dist-packages/cv2/python-3.6
--
--   Python (for build):            /usr/bin/python2.7
--     Pylint:                      /usr/bin/pylint (ver: 1.8.3, checks: 168)
--     Flake8:                      /usr/bin/flake8 (ver: 3.5.0)
--
--   Java:
--     ant:                         NO
--     JNI:                         /usr/lib/jvm/default-java/include /usr/lib/jvm/default-java/include/linux /usr/lib/jvm/default-java/include
--     Java wrappers:               NO
--     Java tests:                  NO
--
--   Install to:                    /usr/local
-- -----------------------------------------------------------------
--
-- Configuring done
Once that is all good, let’s go ahead and do the install:
$ make -j$(nproc) && sudo make install
$ sudo ldconfig
$ pkg-config --modversion opencv
4.0.1
09 Feb 2019
This is a three part series that I will endeavour to update regularly as I discover better workflows.
- Part 1: Hardware Drivers and System OS Installation.
- Part 2 (this post):
Development Environment, Frameworks, and IDE Installation.
- Part 3: Configuring Remote Access and Testing your new Development Environment.
- Part 4 (Optional): Using GPU on Linux without OpenGL and Xorg
- Part 5 (Optional): Windows Raw Disk Virtual Machine
Hardware and System OS
Just a reminder these are the hardware and software configurations I have been using as part of this series.
Hardware Configurations
CPU: Intel Core i9 9900K LGA1151 3.6GHz (5GHz Turbo) 8 Cores, 16 Thread Unlocked
Motherboard: Asus ROG Maximus XI Extreme*
Memory: 32GB DIMM DDR4 3200MHZ
PSU: Asus ROG Thor 1200W 80+ Platinum
Hard Drive: 2x Samsung 970 Pro 521GB V-NAND NVMe M.2 SSD**
Additional Persistent Storage: 3x Samsung 860 Pro 1TB V-NAND SATA SSD in Raid 0 with mdadm
Onboard GPU: Intel UHD Graphics 630
Additional GPU: 2x Asus GeForce RTX 2080 Ti Dual with NVIDIA NVLink
* The Asus AI Overclocking feature of this motherboard allows me to run my CPU at a consistent 4.8GHZ without too
much crazy cooling required. You will need some sort of AIO or custom water cooling to achieve something similar.
** Windows 10 was installed in one SSD to allow easier configurations of BIOS with utilities provided by Asus.
*** There is still some considerations to use Intel Optane Memory Raid however, there are some concerns with PCI-e
lanes with adding too many devices in addition to running dual GPU (will update further).
System Configurations
Linux Kernel: 4.18.0-14-generic*
OS Version: Ubuntu 18.04.1 LTS Bionic
GPU Driver: nvidia-driver-415*
CUDA Version: CUDA 10.0*
* These are the latest versions in the Ubuntu repository as of this post 2019-02-09.
Installing Virtual Environment (Anaconda)
When managing software development environments, particularly those with complex libraries such those used for machine
and deep learning, I prefer to use Anaconda. You could also use
miniconda - a more lightweight version of Anaconda.
$ cd ~/Downloads
$ wget https://repo.continuum.io/archive/Anaconda3-2018.12-Linux-x86_64.sh
$ chmod +x ./Anaconda3-2018.12-Linux-x86_64.sh
$ ./Anaconda3-2018.12-Linux-x86_64.sh
(Optional) Conda Shell Symlinking
One of the things the Anaconda and Miniconda installer likes to do is create a conda shell as part of your preferred
shell session. One of the issues I found with this is you are then forced to use the conda version of Python 3 when
running Python software. This could be an issue if you are required to use Python 2.7 for example which can be
frustrating to have to write /usr/bin/python.
$ which python
/home/user/anaconda3/bin/python

$ python -V
Python 3.7.0
To avoid this, I prefer not to have the conda PATH set in my
environment PATH variables and instead symlink the required programs.
First, remove or comment these lines out of your .bashrc file.
...

# >>> conda initialize >>>
# !! Contents within this block are managed by 'conda init' !!
#__conda_setup="$('/home/user/anaconda3/bin/conda' 'shell.bash' 'hook' 2> /dev/null)"
#if [ $? -eq 0 ]; then
#    eval "$__conda_setup"
#else
#    if [ -f "/home/user/anaconda3/etc/profile.d/conda.sh" ]; then
#        . "/home/user/anaconda3/etc/profile.d/conda.sh"
#    else
#        export PATH="/home/user/anaconda3/bin:$PATH"
#    fi
#fi
#unset __conda_setup
# <<< conda initialize <<<
Now exit out of the shell session as running source .bashrc does not reset the session properly. Then finally,
symlink the required anaconda3 commands.
$ sudo ln -s $HOME/anaconda3/bin/conda /usr/bin/conda
$ sudo ln -s $HOME/anaconda3/bin/activate /usr/bin/activate
$ sudo ln -s $HOME/anaconda3/bin/deactivate /usr/bin/deactivate
$ which python
/usr/bin/python

$ python -V
Python 2.7.15rc1
Anaconda has recently made the CUDA Toolkit available through the anaconda channel. However, the latest version
posted was CUDA 9.0 and with an NVIDIA Turing Architecture GPU, you will need CUDA 10.0 to work properly. So to while
we will not have the benefit of using our conda virtual environment package manager to manage CUDA, we have already
installed CUDA Toolkit 10.0 as above. To make it work within our env, we will need to do some environment variable
settings.
$ source activate deep_learning_cv
(deep_learning_cv) $ conda update mkl
$ conda deactivate
$ mkdir -p $HOME/anaconda3/envs/deep_learning_cv/etc/conda/activate.d
$ mkdir -p $HOME/anaconda3/envs/deep_learning_cv/etc/conda/deactivate.d
$ nano $HOME/anaconda3/envs/deep_learning_cv/etc/conda/activate.d/env_vars.sh
#!/bin/sh
export CUDA_HOME="/usr/local/cuda"
export CUPTI="/usr/local/cuda/extras/CUPTI/lib64"
export LD_LIBRARY_PATH="$CUDA_HOME/lib64:$CUPTI:$LD_LIBRARY_PATH"
$ nano $HOME/anaconda3/envs/deep_learning_cv/etc/conda/deactivate.d/env_vars.sh
#!/bin/sh
unset LD_LIBRARY_PATH
This will properly set the environment variables when you activate your Conda virtual environment. It will also unset
them so they do not mess with your local system.
Creating the deep learning environment
To create an environment with Anaconda, you will generally use the conda command in a terminal. To install packages
for this environment, you will also use either conda install or pip install.
$ conda create --name deep_learning_cv python=3.6 numpy pylint -c anaconda
Collecting package metadata: done
Solving environment: done

## Package Plan ##

  environment location: /home/user/anaconda3/envs/deep_learning_cv

  added / updated specs:
    - numpy
    - pylint
    - python=3.6


The following packages will be downloaded:

    package                    |            build
    ---------------------------|-----------------
    astroid-2.1.0              |           py36_0         271 KB  anaconda
    blas-1.0                   |              mkl           6 KB  anaconda
    isort-4.3.4                |           py36_0          58 KB  anaconda
    lazy-object-proxy-1.3.1    |   py36h14c3975_2          30 KB  anaconda
    mccabe-0.6.1               |           py36_1          14 KB  anaconda
    numpy-1.15.4               |   py36h7e9f1db_0          47 KB  anaconda
    pylint-2.2.2               |           py36_0         828 KB  anaconda
    typed-ast-1.1.0            |   py36h14c3975_0         196 KB  anaconda
    wrapt-1.11.0               |   py36h7b6447c_0          45 KB  anaconda
    ------------------------------------------------------------
                                           Total:         1.5 MB

The following NEW packages will be INSTALLED:
  ...

Proceed ([y]/n)? y


$ source activate deep_learning_cv
$ conda env list
# conda environments:
#
base                     /home/user/anaconda3
deep_learning_cv      *  /home/user/anaconda3/envs/deep_learning_cv
Some notes to consider:
- The
base environment is the conda environment with the default Python (in this case, Python 3.7).
- Using
source activate deep_learning_cv will enter the you created and anything you install with conda will be
added to this environment.
- The asterisk
* from the conda env list output is the currently activated environment.
- From this point onwards, all commands marked
(deep_learning_cv) $ will mean the command was run with the activated environment.
Installing OpenCV from Source
OpenCV (Open Source Computer Vision) is a library that is very popular these days when doing Deep Learning with
Computer Vision or any image processing. It has a C++ and Python interface that we can make use of during development.
While there are ways to install OpenCV using the Anaconda channel, if we prefer to have better control over the
library (meaning we can install both the Python and C++ interface), then the best way is to compile it from source,
installing it within our local environment, and then soft linking it from within the Anaconda environment.
Firstly, ensure you install these dependencies:
$ sudo apt install build-essential cmake unzip pkg-config pylint libjpeg-dev \
libpng-dev libtiff-dev libavcodec-dev libavformat-dev libdc1394-22-dev \
libx264-dev libswscale-dev libv4l-dev libxvidcore-dev libx264-dev libeigen3-dev \
gfortran libhdf5-serial-dev python3-dev python3-tk python-imaging-tk \
ubuntu-restricted-extras libgtk-3-dev libatlas-base-dev libgstreamer1.0-dev \
libgstreamer-plugins-base1.0-dev libavresample-dev libgflags2.2 libgflags-dev
Another dependency required by OpenCV that is not available in the apt repository with Ubuntu 18.04 is libjasper.
To install, follow these manual steps:
$ wget http://security.ubuntu.com/ubuntu/pool/main/j/jasper/libjasper-dev_1.900.1-debian1-2.4ubuntu1.2_amd64.deb
$ wget http://security.ubuntu.com/ubuntu/pool/main/j/jasper/libjasper1_1.900.1-debian1-2.4ubuntu1.2_amd64.deb
$ sudo apt-get install ./libjasper1_1.900.1-debian1-2.4ubuntu1.2_amd64.deb \
  ./libjasper-dev_1.900.1-debian1-2.4ubuntu1.2_amd64.deb
Lets prepare our installation directory:
$ mkdir opencv_install && cd opencv_install
$ git clone https://github.com/opencv/opencv.git
$ git clone https://github.com/opencv/opencv_contrib.git
$ cd opencv; git checkout 3.4.5
$ cd ../opencv_contrib; git checkout 3.4.5
An issue noted in the following #9953 and then solved in
#12957 to get OpenBLAS to work in Ubuntu 18.04.
Install the required dependencies:
$ sudo apt install libopenblas-base libopenblas-dev liblapacke-dev
$ sudo ln -s /usr/include/lapacke.h /usr/include/x86_64-linux-gnu # corrected path for the library
$ nano ../opencv/cmake/OpenCVFindOpenBLAS.cmake
From there, fix the following two lines:
SET(Open_BLAS_INCLUDE_SEARCH_PATHS
  $ENV{OpenBLAS_HOME}
  $ENV{OpenBLAS_HOME}/include
  /opt/OpenBLAS/include
  /usr/local/include/openblas
  /usr/include/openblas
  /usr/local/include/openblas-base
  /usr/include/openblas-base
  /usr/local/include
  /usr/include
)

SET(Open_BLAS_LIB_SEARCH_PATHS
        $ENV{OpenBLAS}cd
        $ENV{OpenBLAS}/lib
        $ENV{OpenBLAS_HOME}
        $ENV{OpenBLAS_HOME}/lib
        /opt/OpenBLAS/lib
        /usr/local/lib64
        /usr/local/lib
        /lib/openblas-base
        /lib64/
        /lib/
        /usr/lib/openblas-base
        /usr/lib64
        /usr/lib
)
to become…
SET(Open_BLAS_INCLUDE_SEARCH_PATHS
  /usr/include/x86_64-linux-gnu
)

SET(Open_BLAS_LIB_SEARCH_PATHS
  /usr/lib/x86_64-linux-gnu
)
Finally, we can download OpenCV from their Github repository and compile the releases we want. In this case, we are
going to install version 3.4.5.
$ cd .. && nano xcmake.sh
xcmake.sh
#!/bin/bash

CONDA_ENV_PATH=/home/user/anaconda3/envs
CONDA_ENV_NAME=deep_learning_cv
WHERE_OPENCV=../opencv
WHERE_OPENCV_CONTRIB=../opencv_contrib

cmake -D CMAKE_BUILD_TYPE=RELEASE \
      -D CMAKE_INSTALL_PREFIX=/usr/local \
      -D BUILD_OPENCV_PYTHON3=ON \
      -D INSTALL_C_EXAMPLES=ON \
      -D INSTALL_PYTHON_EXAMPLES=ON \
      -D PYTHON3_EXECUTABLE=$CONDA_ENV_PATH/$CONDA_ENV_NAME/bin/python \
      -D WITH_STREAMER=ON \
      -D WITH_CUDA=ON \
      -D BUILD_opencv_cudacodec=OFF \
      -D OPENCV_ENABLE_NONFREE=ON \
      -D OPENCV_EXTRA_MODULES_PATH=$WHERE_OPENCV_CONTRIB/modules \
      -D BUILD_EXAMPLES=ON $WHERE_OPENCV
$ sudo chmod u+x xcmake.sh
$ mkdir build && cd build
$ ../xcmake.sh
If all dependencies are met and everything goes well, you should see the following output at the end:
...

--   Other third-party libraries:
--     Intel IPP:                   2019.0.0 Gold [2019.0.0]
--            at:                   /home/user/opencv_install/build/3rdparty/ippicv/ippicv_lnx/icv
--     Intel IPP IW:                sources (2019.0.0)
--               at:                /home/user/opencv_install/build/3rdparty/ippicv/ippicv_lnx/iw
--     Lapack:                      YES (/usr/lib/x86_64-linux-gnu/libopenblas.so)
--     Eigen:                       YES (ver 3.3.4)
--     Custom HAL:                  NO
--     Protobuf:                    build (3.5.1)
--
--   NVIDIA CUDA:                   YES (ver 10.0, CUFFT CUBLAS NVCUVID)
--     NVIDIA GPU arch:             30 35 37 50 52 60 61 70 75
--     NVIDIA PTX archs:
--
--   OpenCL:                        YES (no extra features)
--     Include path:                /home/user/opencv_install/opencv/3rdparty/include/opencl/1.2
--     Link libraries:              Dynamic load
--
--   Python 2:
--     Interpreter:                 /usr/bin/python2.7 (ver 2.7.15)
--     Libraries:                   /usr/lib/x86_64-linux-gnu/libpython2.7.so (ver 2.7.15rc1)
--     numpy:                       /usr/lib/python2.7/dist-packages/numpy/core/include (ver 1.13.3)
--     install path:                lib/python2.7/dist-packages/cv2/python-2.7
--
--   Python 3:
--     Interpreter:                 /home/user/anaconda3/envs/deep_learning_cv/bin/python (ver 3.6.8)
--     Libraries:                   /home/user/anaconda3/envs/deep_learning_cv/lib/libpython3.6m.so (ver 3.6.8)
--     numpy:                       /home/user/anaconda3/envs/deep_learning_cv/lib/python3.6/site-packages/numpy/core/include (ver 1.15.4)
--     install path:                lib/python3.6/site-packages/cv2/python-3.6
--
--   Python (for build):            /usr/bin/python2.7
--     Pylint:                      /home/user/anaconda3/envs/deep_learning_cv/bin/pylint (ver: 3.6.8, checks: 163)
--
--   Java:
--     ant:                         NO
--     JNI:                         /usr/lib/jvm/default-java/include /usr/lib/jvm/default-java/include/linux /usr/lib/jvm/default-java/include
--     Java wrappers:               NO
--     Java tests:                  NO
--
--   Install to:                    /usr/local
-- -----------------------------------------------------------------
--
-- Configuring done
-- Generating done
-- Build files have been written to: /home/user/opencv_install/build
Time to compile and install:
$ make -j4
$ sudo make install
$ sudo ldconfig
Check that you have installed OpenCV:
$ pkg-config --modversion opencv
3.4.5
Finally, symlinking to the conda virtual environment we created earlier:
$ sudo ln -s /usr/local/lib/python3.6/site-packages/cv2/python-3.6/cv2.cpython-36m-x86_64-linux-gnu.so \
  /home/user/anaconda3/envs/deep_learning_cv/lib/python3.6/site-packages/cv2.so
$ source activate deep_learning_cv
(deep_learning_cv) $ python -c "import cv2; print(cv2.__version__)"
3.4.5
Installing mxnet
Ubuntu 18.04 comes shipped with gcc and g++ version 7. However, to compile MxNet from source, you will need to
use gcc version 6. We can easily change the default gcc used by doing adding gcc-6 and g++-6 as an alternative in the configuration files. Make the following script and then run it.
#!/bin/bash

sudo apt update && sudo apt install gcc-7 g++-7 gcc-6 g++-6

sudo update-alternative --remove-all gcc
sudo update-alternative --remove-all g++

sudo update-alternatives --install /usr/bin/gcc gcc /usr/bin/gcc-7 100
sudo update-alternatives --install /usr/bin/gcc gcc /usr/bin/gcc-6 90

sudo update-alternatives --install /usr/bin/g++ g++ /usr/bin/g++-7 100
sudo update-alternatives --install /usr/bin/g++ g++ /usr/bin/g++-6 90

sudo update-alternatives --set cc /usr/bin/gcc
sudo update-alternatives --set c++ /usr/bin/g++
Then make it executable and then run it and select the appropriate gcc and g++ to use for now.
$ sudo chmod +x config_multiple_cc.sh
$ sudo update-alternatives --config gcc
There are 2 choices for the alternative gcc (providing /usr/bin/gcc).

  Selection    Path            Priority   Status
------------------------------------------------------------
* 0            /usr/bin/gcc-7   100       auto mode
  1            /usr/bin/gcc-6   90        manual mode
  2            /usr/bin/gcc-7   100       manual mode

Press <enter> to keep the current choice[*], or type selection number: 1
update-alternatives: using /usr/bin/gcc-6 to provide /usr/bin/gcc (gcc) in manual mode

$ gcc --version
gcc (Ubuntu 6.5.0-2ubuntu1~18.04) 6.5.0 20181026
...

$ sudo update-alternatives --config g++
There are 2 choices for the alternative g++ (providing /usr/bin/g++).

  Selection    Path            Priority   Status
------------------------------------------------------------
* 0            /usr/bin/g++-7   100       auto mode
  1            /usr/bin/g++-6   90        manual mode
  2            /usr/bin/g++-7   100       manual mode

Press <enter> to keep the current choice[*], or type selection number: 1
update-alternatives: using /usr/bin/g++-6 to provide /usr/bin/g++ (g++) in manual mode

$ g++ --version
g++ (Ubuntu 6.5.0-2ubuntu1~18.04) 6.5.0 20181026
...
We can now clone and install mxnet:
(deep_learning_cv) $ git clone --recursive --no-checkout https://github.com/apache/incubator-mxnet.git mxnet
(deep_learning_cv) $ mv mxnet /home/user/.local/share/
(deep_learning_cv) $ git checkout 1.3.1
(deep_learning_cv) $ git submodule update --init
(deep_learning_cv) $ make -j $(nproc) USE_OPENCV=1 USE_BLAS=openblas USE_CUDA=1 \
USE_CUDA_PATH=/usr/local/cuda USE_CUDNN=1 \
USE_LAPACK_PATH=/usr/lib/x86_64-linux-gnu USE_LAPACK=1 USE_MKLDNN=1
Once that is complete, we simply link it to our Anaconda3 virtual environment and then test:
$ ln -s $HOME/.local/share/mxnet $HOME/anaconda3/envs/deep_learning_cv/lib/python3.6/site-packages/mxnet
$ source activate deep_learning_cv
(deep_learning_cv) $ python

Python 3.6.8 |Anaconda, Inc.| (default, Dec 30 2018, 01:22:34)
[GCC 7.3.0] on linux
Type "help", "copyright", "credits" or "license" for more information.
>>> import mxnet
>>>
Installing Tensorflow GPU from Source
So as I was writing this post, I came across some issues using CUDA Toolkit version 10.0 with the tensorflow-gpu package as part of the PyPi and Conda repositories. Using the anaconda channel would have been, however, it installs CUDA Toolkit 9.0 and cuDNN 7 by default. Since we already have CUDA 10.0 installed, I though it would be more prudent in this case to install tensorflow from source files so that it works with CUDA 10.0 and cuDNN 7.3.1. There are very few tutorials out there that specifically show you how to manage this using an Anaconda virtual environment. However, there are some clues here and here. The official Tensorflow installation guide also has steps for virtual environments.
NCCL
The NVIDIA Collective Communications Library (NCCL) allows you to handle communication across multiple-GPU simultaneously.
As of this post, the latest version is 2.4.2, for CUDA 10.0, Jan 29. 2019. Go to this link and click on Local installer for Ubuntu18.04 to your $HOME/Downloads$ directory.
$ sudo dpkg -i $HOME/Downloads/nccl-repo-ubuntu1804-2.4.2-ga-cuda10.0_1-1_amd64.deb
$ sudo apt-key add /var/nccl-repo-2.4.2-ga-cuda10.0/7fa2af80.pub
$ sudo apt update
$ sudo apt install libnccl2 libnccl-dev
$ sudo ldconfig
Dependencies
$ source activate deep_learning_cv
$ pip install -U pip six wheel mock
$ pip install -U keras_applications==1.0.6 --no-deps
$ pip install -U keras_preprocessing==1.0.5 --no-deps
Bazel
Bazel is a build tool used for building Tensorflow.
$ wget https://github.com/bazelbuild/bazel/releases/download/0.21.0/bazel-0.21.0-installer-linux-x86_64.sh
$ sudo chmod +x bazel-0.21.0-installer-linux-x86_64.sh
./bazel-0.21.0-installer-linux-x86_64.sh
$ echo 'export PATH="$PATH:$HOME/bin"' >> ~/.bashrc
$ source $HOME/.bashrc
$ sudo ldconfig
$ bazel version

WARNING: --batch mode is deprecated. Please instead explicitly shut down your Bazel server using the command "bazel shutdown".
INFO: Invocation ID: 60babe73-16ad-42b7-8474-9f617853c4e2
Build label: 0.21.0
Build target: bazel-out/k8-opt/bin/src/main/java/com/google/devtools/build/lib/bazel/BazelServer_deploy.jar
Build time: Wed Dec 19 12:58:44 2018 (1545224324)
Build timestamp: 1545224324
Build timestamp as int: 1545224324
(Optional) Install TensorRT
TensorRT is a C++ library that has incredibly good performance for NVIDIA GPUs. As part of the project I am going to be working on soon, I will need to implement a Deep Learning algorithm in TensorRT to optimize the performance. So due to this, I am going to install TensorRT as well before installing Tensorflow so I can have both libraries configured properly. The steps to install TensorRT can be found here.
First, download the appropriate version after you agree to the terms and conditions. In this case, we will be using TensorRT 5.0.2.6 GA for Ubuntu 1804 and CUDA 10.0 DEB local repo packages. This version is currently supported by the Tensorflow version we will be installing below.
$ sudo dpkg -i nv-tensorrt-repo-ubuntu1804-cuda10.0-trt5.0.2.6-ga-20181009_1-1_amd64.deb
$ sudo apt-key add /var/nv-tensorrt-repo-cuda10.0-trt5.0.2.6-ga-20181009/7fa2af80.pub
OK

$ sudo apt install libnvinfer5 libnvinfer-dev libnvinfer-samples tensorrt
$ sudo apt install python3-libnvinfer-dev
$ sudo apt install uff-converter-tf
Tensorflow GPU
Now we download the latest version of Tensorflow and begin the process of installing it with proper variables. Please be very careful which directories you select to make this work.
$ cd $HOME
$ git clone https://github.com/tensorflow/tensorflow.git
$ cd tensorflow
$ git checkout r1.13
$ ./configure
Now we begin changing the build configuration variables as appropriate.
WARNING: --batch mode is deprecated. Please instead explicitly shut down your Bazel server using the command "bazel shutdown".
INFO: Invocation ID: b6fc6907-7a4d-47d6-addf-25915920fc92
You have bazel 0.21.0 installed.
Please specify the location of python. [Default is /home/codeninja/anaconda3/envs/deep_learning_cv/bin/python]: /home/codeninja/anaconda3/envs/deep_learning_cv/bin/python


Found possible Python library paths:
  /home/codeninja/anaconda3/envs/deep_learning_cv/lib/python3.6/site-packages
Please input the desired Python library path to use.  Default is [/home/codeninja/anaconda3/envs/deep_learning_cv/lib/python3.6/site-packages]
/home/codeninja/anaconda3/envs/deep_learning_cv/lib/python3.6/site-packages
Do you wish to build TensorFlow with XLA JIT support? [Y/n]: Y
XLA JIT support will be enabled for TensorFlow.

Do you wish to build TensorFlow with OpenCL SYCL support? [y/N]: N
No OpenCL SYCL support will be enabled for TensorFlow.

Do you wish to build TensorFlow with ROCm support? [y/N]: N
No ROCm support will be enabled for TensorFlow.

Do you wish to build TensorFlow with CUDA support? [y/N]: Y
CUDA support will be enabled for TensorFlow.

Please specify the CUDA SDK version you want to use. [Leave empty to default to CUDA 10.0]: 10.0


Please specify the location where CUDA 10.0 toolkit is installed. Refer to README.md for more details. [Default is /usr/local/cuda]: /usr/local/cuda


Please specify the cuDNN version you want to use. [Leave empty to default to cuDNN 7]: 7.4.2


Please specify the location where cuDNN 7 library is installed. Refer to README.md for more details. [Default is /usr/local/cuda]: /usr/local/cuda


Do you wish to build TensorFlow with TensorRT support? [y/N]: Y
TensorRT support will be enabled for TensorFlow.

Please specify the location where TensorRT is installed. [Default is /usr/lib/x86_64-linux-gnu]:


Please specify the locally installed NCCL version you want to use. [Default is to use https://github.com/nvidia/nccl]: 2.4.2


NCCL libraries found in /usr/lib/x86_64-linux-gnu/libnccl.so
This looks like a system path.
Assuming NCCL header path is /usr/include
Please specify a list of comma-separated Cuda compute capabilities you want to build with.
You can find the compute capability of your device at: https://developer.nvidia.com/cuda-gpus.
Please note that each additional compute capability significantly increases your build time and binary size. [Default is: 7.5]: 7.5


Do you want to use clang as CUDA compiler? [y/N]: N
nvcc will be used as CUDA compiler.

Please specify which gcc should be used by nvcc as the host compiler. [Default is /usr/bin/gcc]: /usr/bin/gcc


Do you wish to build TensorFlow with MPI support? [y/N]: N
No MPI support will be enabled for TensorFlow.

Please specify optimization flags to use during compilation when bazel option "--config=opt" is specified [Default is -march=native -Wno-sign-compare]: -march=native


Would you like to interactively configure ./WORKSPACE for Android builds? [y/N]: N
Not configuring the WORKSPACE for Android builds.

Preconfigured Bazel build configs. You can use any of the below by adding "--config=<>" to your build command. See .bazelrc for more details.
	--config=mkl         	# Build with MKL support.
	--config=monolithic  	# Config for mostly static monolithic build.
	--config=gdr         	# Build with GDR support.
	--config=verbs       	# Build with libverbs support.
	--config=ngraph      	# Build with Intel nGraph support.
	--config=dynamic_kernels	# (Experimental) Build kernels into separate shared objects.
Preconfigured Bazel build configs to DISABLE default on features:
	--config=noaws       	# Disable AWS S3 filesystem support.
	--config=nogcp       	# Disable GCP support.
	--config=nohdfs      	# Disable HDFS support.
	--config=noignite    	# Disable Apacha Ignite support.
	--config=nokafka     	# Disable Apache Kafka support.
	--config=nonccl      	# Disable NVIDIA NCCL support.
Configuration finished
Building with bazel
The next step is to build from the configurations we just completed. Please note this may take a long time depending on the computation power of your CPU and system.
The following will build a pip package that we can use in our virtual environment later.
$ bazel build --config=opt --config=mkl --config=cuda //tensorflow/tools/pip_package:build_pip_package

Target //tensorflow/tools/pip_package:build_pip_package up-to-date:
  bazel-bin/tensorflow/tools/pip_package/build_pip_package
INFO: Elapsed time: 3629.167s, Critical Path: 286.01s
INFO: 15303 processes: 15303 local.
INFO: Build completed successfully, 18989 total actions
Some Notes:
- add “–config=mkl” if you want Intel MKL support for newer intel cpu for faster training on cpu
- add “–config=monolithic” if you want static monolithic build (try this if build failed)
- add “–local_resources 2048,.5,1.0” if your PC has low ram causing Segmentation fault or other related errors
(Optional) Build Tensorflow with Intel MKL with AVX, AVX2, and AVX512
$ bazel build --config=opt --config=cuda --config=mkl -c opt --copt=-mavx --copt=-mavx2 --copt=-mfma --copt=-mavx512f --copt=-mavx512pf --copt=-mavx512cd --copt=-mavx512er //tensorflow/tools/pip_package:build_pip_package
If everything worked fine, it should look like the output above. Finally, we need to make the pip package and then install it to our Anaconda virtual env.
$ bazel-bin/tensorflow/tools/pip_package/build_pip_package tensorflow_pkg
$ $ cd tensorflow_pkg
$ source activate deep_learning_cv
(deep_learning_cv) $ pip install tensorflow-1.13.0rc1-cp36-cp36m-linux_x86_64.whl
To finish off, we will just quickly test it.
(deep_learning_cv) $ python
Python 3.6.8 |Anaconda, Inc.| (default, Dec 30 2018, 01:22:34)
[GCC 7.3.0] on linux
Type "help", "copyright", "credits" or "license" for more information.
>>> import tensorflow as tf
>>> hello = tf.constant('Hello, TensorFlow!')
>>> sess = tf.Session()

2019-02-10 20:43:10.467012: I tensorflow/core/platform/profile_utils/cpu_utils.cc:94] CPU Frequency: 3600000000 Hz
2019-02-10 20:43:10.467622: I tensorflow/compiler/xla/service/service.cc:150] XLA service 0x55c2348570d0 executing computations on platform Host. Devices:
2019-02-10 20:43:10.467637: I tensorflow/compiler/xla/service/service.cc:158]   StreamExecutor device (0): <undefined>, <undefined>
2019-02-10 20:43:10.630042: I tensorflow/stream_executor/cuda/cuda_gpu_executor.cc:998] successful NUMA node read from SysFS had negative value (-1), but there must be at least one NUMA node, so returning NUMA node zero
2019-02-10 20:43:10.630525: I tensorflow/compiler/xla/service/service.cc:150] XLA service 0x55c2346448e0 executing computations on platform CUDA. Devices:
2019-02-10 20:43:10.630535: I tensorflow/compiler/xla/service/service.cc:158]   StreamExecutor device (0): GeForce RTX 2080 Ti, Compute Capability 7.5
2019-02-10 20:43:10.630820: I tensorflow/core/common_runtime/gpu/gpu_device.cc:1433] Found device 0 with properties:
name: GeForce RTX 2080 Ti major: 7 minor: 5 memoryClockRate(GHz): 1.56
pciBusID: 0000:01:00.0
totalMemory: 10.73GiB freeMemory: 9.20GiB
2019-02-10 20:43:10.630830: I tensorflow/core/common_runtime/gpu/gpu_device.cc:1512] Adding visible gpu devices: 0
2019-02-10 20:43:10.858953: I tensorflow/core/common_runtime/gpu/gpu_device.cc:984] Device interconnect StreamExecutor with strength 1 edge matrix:
2019-02-10 20:43:10.858978: I tensorflow/core/common_runtime/gpu/gpu_device.cc:990]      0
2019-02-10 20:43:10.858982: I tensorflow/core/common_runtime/gpu/gpu_device.cc:1003] 0:   N
2019-02-10 20:43:10.859211: I tensorflow/core/common_runtime/gpu/gpu_device.cc:1115] Created TensorFlow device (/job:localhost/replica:0/task:0/device:GPU:0 with 8861 MB memory) -> physical GPU (device: 0, name: GeForce RTX 2080 Ti, pci bus id: 0000:01:00.0, compute capability: 7.5)
2019-02-10 20:43:10.860079: I tensorflow/core/common_runtime/process_util.cc:71] Creating new thread pool with default inter op setting: 2. Tune using inter_op_parallelism_threads for best performance.

>>> print(sess.run(hello))

b'Hello, TensorFlow!'

>>>
If your output is the same as above, then you have successfully installed TensorFlow with GPU.
Installing PyTorch
To install PyTorch from source, ensure you create the LD_LIBRARY_PATH environment variables for the Anaconda virtual environment as we did previously. Apart from that, we can now install some dependencies:
$ source activate deep_learning_cv
(deep_learning_cv) $ conda install numpy pyyaml mkl mkl-include setuptools cmake cffi typing
(deep_learning_cv) $ pip install pytorch
(deep_learning_cv) $ conda install -c cpbotha magma-cuda10
Get the PyTorch source and install with some custom variables.
(deep_learning_cv) $ git clone --recursive https://github.com/pytorch/pytorch
(deep_learning_cv) $ cd pytorch
(deep_learning_cv) $ export CMAKE_PREFIX_PATH=${CONDA_PREFIX:-"$(dirname $(which conda))/../"}
(deep_learning_cv) $ sudo apt install protobuf-compiler libprotobuf-dev
(deep_learning_cv) $ export USE_OPENCV=ON
(deep_learning_cv) $ export BLAS=OpenBLAS
(deep_learning_cv) $ export USE_TENSORRT=ON
(deep_learning_cv) $ export MAX_JOBS=16
(deep_learning_cv) $ export CUDNN_LIB_DIR="$CUDA_HOME/lib64/"
(deep_learning_cv) $ export CUDNN_INCLUDE="$CUDA_HOME/include/"
(deep_learning_cv) $ python setup.py install
Now let’s just run a quick test:
(deep_learning_cv) $ cd ..
(deep_learning_cv) $ python -c 'import torch' 2>/dev/null && echo "Success" || echo "Failure"
Success

(deep_learning_cv) $ python -c 'import torch; print(torch.cuda.is_available())'
True
If you want to do a more comprehensive test, do the following:
(deep_learning_cv) $ cd $HOME/pytorch
(deep_learning_cv) $ python test/run_test.py --exclude cpp_extensions

Test executor: ['/home/user/anaconda3/envs/deep_learning_cv/bin/python']
Running test_autograd ... [2019-02-11 01:28:46.842847]
................................................................................
Finally, we will need to install torchvision:
(deep_learning_cv) $ cd $HOME/pytorch
(deep_learning_cv) $ git clone https://github.com/pytorch/vision
(deep_learning_cv) $ cd vision
(deep_learning_cv) $ python setup.py install
Installing other deep learning libraries
Finally, there is one other library we are going to install and test with GPU. That library is Keras.
(deep_learning_cv) $ pip install keras
To test that it works with our TensorFlow GPU backend, we will run the following:
(deep_learning_cv) $ python

Python 3.6.8 |Anaconda, Inc.| (default, Dec 30 2018, 01:22:34)
[GCC 7.3.0] on linux
Type "help", "copyright", "credits" or "license" for more information.
>>> from keras import backend as K
>>> K.tensorflow_backend._get_available_gpus()
2019-02-11 01:44:00.385863: I tensorflow/core/platform/profile_utils/cpu_utils.cc:94] CPU Frequency: 3600000000 Hz
2019-02-11 01:44:00.387428: I tensorflow/compiler/xla/service/service.cc:150] XLA service 0x558c0ba50990 executing computations on platform Host. Devices:
2019-02-11 01:44:00.387485: I tensorflow/compiler/xla/service/service.cc:158]   StreamExecutor device (0): <undefined>, <undefined>
2019-02-11 01:44:00.671487: I tensorflow/stream_executor/cuda/cuda_gpu_executor.cc:998] successful NUMA node read from SysFS had negative value (-1), but there must be at least one NUMA node, so returning NUMA node zero
2019-02-11 01:44:00.672758: I tensorflow/compiler/xla/service/service.cc:150] XLA service 0x558c0b1a6b10 executing computations on platform CUDA. Devices:
2019-02-11 01:44:00.672800: I tensorflow/compiler/xla/service/service.cc:158]   StreamExecutor device (0): GeForce RTX 2080 Ti, Compute Capability 7.5
2019-02-11 01:44:00.673333: I tensorflow/core/common_runtime/gpu/gpu_device.cc:1433] Found device 0 with properties:
name: GeForce RTX 2080 Ti major: 7 minor: 5 memoryClockRate(GHz): 1.56
pciBusID: 0000:01:00.0
totalMemory: 10.73GiB freeMemory: 9.07GiB
2019-02-11 01:44:00.673355: I tensorflow/core/common_runtime/gpu/gpu_device.cc:1512] Adding visible gpu devices: 0
2019-02-11 01:44:01.180883: I tensorflow/core/common_runtime/gpu/gpu_device.cc:984] Device interconnect StreamExecutor with strength 1 edge matrix:
2019-02-11 01:44:01.180939: I tensorflow/core/common_runtime/gpu/gpu_device.cc:990]      0
2019-02-11 01:44:01.180954: I tensorflow/core/common_runtime/gpu/gpu_device.cc:1003] 0:   N
2019-02-11 01:44:01.181396: I tensorflow/core/common_runtime/gpu/gpu_device.cc:1115] Created TensorFlow device (/job:localhost/replica:0/task:0/device:GPU:0 with 8733 MB memory) -> physical GPU (device: 0, name: GeForce RTX 2080 Ti, pci bus id: 0000:01:00.0, compute capability: 7.5)
2019-02-11 01:44:01.185912: I tensorflow/core/common_runtime/process_util.cc:71] Creating new thread pool with default inter op setting: 2. Tune using inter_op_parallelism_threads for best performance.
['/job:localhost/replica:0/task:0/device:GPU:0']
>>>
That is all folks!
This was an extremely long post but there were a lot of frameworks and libraries installed. If you only needed some of them, you could have easily skipped the others. Thanks for reading. I will endeavour to get another post out soon.
27 Dec 2018
So while I have only recently slowly got into data science and using deep learning libraries. I have been preparing for
this future ever since I started my computer science degree two years ago. And now it has come the time I really
(yes, really) needed to get myself some better hardware to move to the next level of my education.
While there are some people out there who believe using a cloud solution was always going to be better than outlaying
the capital cost for your own local system. I however, believe that over time, building and managing your own system
can be beneficial for both understanding deep learning and the environments required to develop them in.
Additionally, the new NVIDIA Turing architecture GeForce 2080 Ti GPU is also a great one for use with gaming. I
am also lucky to be be a research assistant at the University of Wollongong developing large-scale big data
applications with Spark. For this, I needed my own system at home that I could use as a master node to control any
additional distributed systems I can build.
Machine learning and deep learning optimized computers are an expensive endeavour. Trust me, I have looked (if you are
curious, this prebuilt device by nVidia is pretty slick). While my
system is worth more than what most people would spend on a PC, I reasoned that I would using this to build some fairly
large ML models before long and would use it going forward into my academic research career. So I was more than willing
to add some serious juice. If you would like to read more about the best components for your own Deep Learning PC, I
highly recommending reading this post by Tim
Dettmers which I found to be really beneficial when I was planning my build.
This is a post series as a reminder to myself as much as to help those who are considering building and setting up a
similar system. Any comments or suggestions would be welcome as I am still a student learning about how to best
configure these systems.
This is a three part series that I will endeavour to update regularly as I discover better workflows. Additionally,
there will be an optional fourth and fifth part discussing about how to use the GPU without attaching the screen to
it and running Windows 10 from within Linux using a raw disk.
- Part 1 (this post): Hardware Drivers and System OS Installation.
- Part 2: Development Environment, Frameworks, and IDE Installation.
- Part 3: Configuring Remote Access and Testing your new Development Environment.
- Part 4 (Optional): Using GPU on Linux without OpenGL and Xorg
- Part 5 (Optional): Windows Raw Disk Virtual Machine
1.0 Hardware and System OS Installation
Hardware Configurations
CPU: Intel Core i9 9900K LGA1151 3.6GHz (5GHz Turbo) 8 Cores, 16 Thread Unlocked
Motherboard: Asus ROG Maximus XI Extreme*
Memory: 32GB DIMM DDR4 3200MHZ
PSU: Asus ROG Thor 1200W 80+ Platinum
Hard Drive: 2x Samsung 970 Pro 521GB V-NAND NVMe M.2 SSD**
Additional Persistent Storage: 3x Samsung 860 Pro 1TB V-NAND SATA SSD in Raid 0 with mdadm
Onboard GPU: Intel UHD Graphics 630
Additional GPU: 2x Asus GeForce RTX 2080 Ti Dual with NVIDIA NVLink
* The Asus AI Overclocking feature of this motherboard allows me to run my CPU at a consistent 4.8GHZ without too
much crazy cooling required. You will need some sort of AIO or custom water cooling to achieve something similar.
** Windows 10 was installed in one SSD to allow easier configurations of BIOS with utilities provided by Asus.
There is still some considerations to use Intel Optane Memory Raid however, there are some concerns with PCI-e lanes with adding too many devices in addition to running dual GPU (will update further).
System Configurations
Linux Kernel: 4.18.0-14-generic*
OS Version: Ubuntu 18.04.1 LTS Bionic
GPU Driver: nvidia-driver-415*
CUDA Version: CUDA 10.0*
* These are the latest versions in the Ubuntu repository as of this post 2019-02-09.
Pre-Installation System Settings
- Use F8 to enter one-time boot menu
- Install Windows 10 to use the Asus EZUpdate provided utility for quick BIOS updates.
- Press F2 when you see the Republic of Gamers logo to enter BIOS settings.
- Ensure
Secure Boot is set to Other OS to turn off Secure Boot otherwise Nvidia drivers won’t work.
- Disable
Fast Boot
- Download from here or directly from
ubuntu-18.04.1-desktop-amd64.iso and create a
bootable USB with Win32DiskImager.
Installing Ubuntu
When installing Ubuntu, ensure you are installing the full version and not the minimal version. I have had troubles with
these configurations in the past using minimal install. Also ensure you are installing Ubuntu 18.04 on the SSD that is
empty, not the one that you used to install Windows 10. Usually this will be either nvme0n1 or nvme1n1.
Additionally, I prefer to encrypt my Ubuntu OS whenever I use it so I also selected ‘LVM’ and ‘Encryption’.
Once Ubuntu has finished installing, the first thing you will need to do is update the system to the latest versions of
packages. To do this, run this in a terminal.
$ sudo apt update && sudo apt dist-upgrade
Additionally, we will be using the latest kernel available to ensure the best support for the hardware of the PC. The
Ubuntu 18.04.1 install comes prepackaged with kernel 4.15, however, the latest at the time of writing was 4.18.x in
the Ubuntu repository.
To install this, we will manually install via apt.
2.0 Setting up the Ubuntu 18.04 for Hardware Compatibility
At this stage, we want to set up the Ubuntu to ensure all packages required for deep learning and GPU support will be
ready. To do this, we will also be installing some additional useful packages.
$ sudo apt update
$ sudo apt install linux-headers-4.18.0-15 \
  linux-headers-4.18.0-15-generic \
  linux-image-4.18.0-15-generic \
  linux-modules-4.18.0-15-generic \
$ sudo reboot
Git and Git LFS
Version control and large file control for large datasets that will be used.
$ sudo apt install -y git
$ git config --global user.name "your-user-name"
$ git config --global user.email "your-github-email"
To install Git LFS, you will need to follow these commands:
$ sudo apt install -y gnupg apt-transport-https
$ curl -L https://packagecloud.io/github/git-lfs/gpgkey | sudo apt-key add -
$ deb https://packagecloud.io/github/git-lfs/ubuntu/ $(lsb_release -cs) main
$ deb-src https://packagecloud.io/github/git-lfs/ubuntu/ $(lsb_release -cs) main
$ sudo apt update
$ sudo apt install -y git-lfs
One of my favourite IDE to use during development it JetBrain’s various development editors - particularly PyCharm and
IntelliJ IDEA. To easily install as many of them as possible, Jetbrains provides a
Toolbox application you can use to easily install each individual IDE. To
install the Toolbox app, create a script and use it to install.
$ touch jetbrains-toolbox.sh
$ nano jetbrains-toolbox.sh
- Create a shell script as below using any editor.
- In this example, I have used the
nano editor and then copied from below and used Ctrl + Alt + V to paste.
#!/bin/bash

function getLatestUrl() {
  USER_AGENT=('User-Agent: Mozilla/5.0 (X11; Linux x86_64) AppleWebKit/537.36 (KHTML, like Gecko) Chrome/59.0.3071.115 Safari/537.36')

  URL=$(curl 'https://data.services.jetbrains.com//products/releases?code=TBA&latest=true&type=release' -H 'Origin: https://www.jetbrains.com' -H 'Accept-Encoding: gzip, deflate, br' -H 'Accept-Language: en-US,en;q=0.8' -H "${USER_AGENT[@]}" -H 'Accept: application/json, text/javascript, */*; q=0.01' -H 'Referer: https://www.jetbrains.com/toolbox/download/' -H 'Connection: keep-alive' -H 'DNT: 1' --compressed | grep -Po '"linux":.*?[^\\]",' | awk -F ':' '{print $3,":"$4}'| sed 's/[", ]//g')
  echo $URL
}
getLatestUrl
FILE=$(basename ${URL})
DEST=$PWD/$FILE

actionMessage "Downloading Toolbox files"
wget -cO  ${DEST} ${URL} --read-timeout=5 --tries=0
echo ""
generalMessage "Download complete."

DIR="/opt/jetbrains-toolbox"
actionMessage "Installing to $DIR"

if mkdir ${DIR}; then
    tar -xzf ${DEST} -C ${DIR} --strip-components=1
fi

chmod -R +rwx ${DIR}
touch ${DIR}/jetbrains-toolbox.sh
echo "#!/bin/bash" >> $DIR/jetbrains-toolbox.sh
echo "$DIR/jetbrains-toolbox" >> $DIR/jetbrains-toolbox.sh
echo ""
ln -s ${DIR}/jetbrains-toolbox.sh /usr/local/bin/jetbrains-toolbox
chmod -R +rwx /usr/local/bin/jetbrains-toolbox
rm ${DEST}
Back at the terminal to install and run for the first time.
$ sudo chmod +x jetbrains-toolbox.sh
$ sudo ./jetbrains-toolbox.sh
$ jetbrains-toolbox
- After you run
jetbrains-toolbox for the first time, a desktop application shortcut will be added which you can
use next time to run the tool.
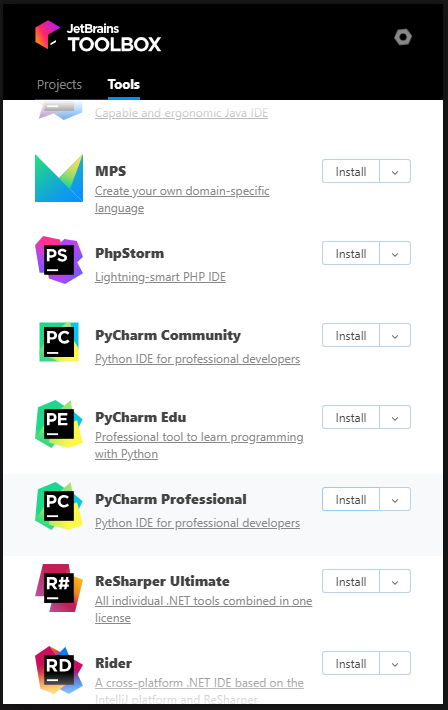
- Make sure you install PyCharm Community or Professional after this by signing into your JetBrains account and going
to Tools and pressing Install for the PyCharm Professional or Community.
4.0 Installing NVIDIA GPU drivers
Some of the deep learning libraries we will be installing later will use the GPU and CUDA to allow better processing of
machine learning computations. To ensure they work properly, you must install the correct proprietary drivers for your
GPU. In my case, the following will work.
4.1
Check that your GPU is visible to the kernel via the PCI-e lanes:
$ lspci -nn | grep -i nvidia

01:00.0 VGA compatible controller [0300]: NVIDIA Corporation Device [10de:1e07] (rev a1)
01:00.1 Audio device [0403]: NVIDIA Corporation Device [10de:10f7] (rev a1)
01:00.2 USB controller [0c03]: NVIDIA Corporation Device [10de:1ad6] (rev a1)
01:00.3 Serial bus controller [0c80]: NVIDIA Corporation Device [10de:1ad7] (rev a1)

$ sudo lshw -numeric -C display

*-display
       description: VGA compatible controller
       product: NVIDIA Corporation [10DE:1E07]
       vendor: NVIDIA Corporation [10DE]
       physical id: 0
       bus info: pci@0000:01:00.0
       logical name: /dev/fb0
       version: a1
       width: 64 bits
       clock: 33MHz
       capabilities: pm msi pciexpress vga_controller bus_master cap_list rom fb
       configuration: depth=32 driver=nvidia latency=0 mode=3440x1440 visual=truecolor xres=3440 yres=1440
       resources: iomemory:600-5ff iomemory:600-5ff irq:178 memory:80000000-80ffffff memory:6000000000-600fffffff memory:6010000000-6011ffffff ioport:3000(size=128) memory:81000000-8107ffff
  *-display
       description: VGA compatible controller
       product: Intel Corporation [8086:3E98]
       vendor: Intel Corporation [8086]
       physical id: 2
       bus info: pci@0000:00:02.0
       version: 00
       width: 64 bits
       clock: 33MHz
       capabilities: pciexpress msi pm vga_controller bus_master cap_list rom
       configuration: driver=i915 latency=0
       resources: iomemory:600-5ff iomemory:400-3ff irq:145 memory:6013000000-6013ffffff memory:4000000000-400fffffff ioport:4000(size=64) memory:c0000-dffff
You will need to install some additional Linux packages for later so do them now.
$ sudo apt update
$ sudo apt install -y gcc gcc-6 g++-6 build-essential cmake unzip pkg-config libxmu-dev libxi-dev \
  freeglut3-dev libx11-dev libfreeimage3 libfreeimage3-dev libglu1-mesa libglu1-mesa-dev \
  libjpeg-dev libpng-dev libtiff-dev libavcodec-dev libavformat-dev libswscale-dev libv4l-dev \
  libxvidcore-dev libx264-dev libgtk-3-dev libopenblas-dev libatlas-base-dev \
  liblapack-dev gfortran libhdf5-serial-dev python3-dev python3-tk python-imaging-tk ubuntu-restricted-extras
4.2
Next, Ubuntu comes with a default open-source driver for GPU called ‘nouveau’. Allowing this driver to be loaded will
interfere with the NVIDIA drivers. To blacklist this during boot up, create the following configuration file in
/etc/modprobe.d/blacklist-nouveau.conf.
$ sudo touch /etc/modprobe.d/blacklist-nouveau.conf
$ sudo nano /etc/modprobe.d/blacklist-nouveau.conf
blacklist-nouveau.conf
blacklist nouveau
blacklist lbm-nouveau
options nouveau modeset=0
alias nouveau off
alias lbm-nouveau off
After creating the above conf file, ensure you update the systemd boot up process by running these commands and then
rebooting.
$ sudo echo "options nouveau modeset=0" | sudo tee -a /etc/modprobe.d/nouveau-kms.conf
$ sudo update-initramfs -u
$ sudo update-grub
$ sudo reboot
[IMPORTANT !!!] After you have rebooted back to Ubuntu, ensure you follow these steps carefully.
4.3
Before you login to the Ubuntu X Window System, press Ctl + Alt + F3 to use the virtual console tty3. Login
through the TTY subsystem as below:
  Ubuntu 18.04 SYSTEM-HOSTNAME tty3
  XXXX login: your-user-login
  Password: ********
  $
4.4
Check that you have blacklisted ‘nouveau’ properly by running:
$ lsmod | grep -i nouveau
You should see nothing returned.
4.5
We need to stop the display manager and drop to run level 3 next.
  $ sudo service gdm3 stop
  $ sudo service --status-all | grep -i gdm3

  [ - ]  gdm3

  $ sudo init 3
* Ensure that the [ - ] is showing for gdm3 which means you have stopped the service properly.
4.6
We are going to use a PPA which will allow us to use the latest NVIDIA proprietary drivers.
  $ sudo add-apt-repository ppa:graphics-drivers/ppa
  $ sudo apt update
Before we install the driver, we will use Ubuntu to find out what is the recommended driver for our GPU.
  $ ubuntu-drivers devices

  == /sys/devices/pci0000:00/0000:00:01.0/0000:01:00.0 ==
  modalias : pci:v000010DEd00001E07sv00001043sd00008668bc03sc00i00
  vendor   : NVIDIA Corporation
  driver   : nvidia-driver-415 - third-party free recommended
  driver   : nvidia-driver-410 - third-party free
  driver   : xserver-xorg-video-nouveau - distro free builtin
- The output above says that
nvidia-driver-415 is the recommended proprietary driver to use so we will install that.
- You could also just install the driver using
sudo ubuntu-drivers autoinstall which would install the recommended
driver.
Finally, we will install the NVIDIA driver and an additional utility called nvidia-modprobe.
  $ sudo apt install -y nvidia-driver-415 nvidia-modprobe
  $ sudo reboot
- During installation, you will be asked to follow some prompts. Once the installation is done, ensure you reboot.
After installation, we can test if everything went well.
$ nvidia-modprobe
$ nvidia-smi

+-----------------------------------------------------------------------------+
| NVIDIA-SMI 415.25       Driver Version: 415.25       CUDA Version: 10.0     |
|-------------------------------+----------------------+----------------------+
| GPU  Name        Persistence-M| Bus-Id        Disp.A | Volatile Uncorr. ECC |
| Fan  Temp  Perf  Pwr:Usage/Cap|         Memory-Usage | GPU-Util  Compute M. |
|===============================+======================+======================|
|   0  GeForce RTX 208...  Off  | 00000000:01:00.0  On |                  N/A |
| 19%   54C    P0    54W / 260W |   1476MiB / 10989MiB |      2%      Default |
+-------------------------------+----------------------+----------------------+

+-----------------------------------------------------------------------------+
| Processes:                                                       GPU Memory |
|  GPU       PID   Type   Process name                             Usage      |
|=============================================================================|
|    0      1570      G   /usr/lib/xorg/Xorg                           660MiB |
|    0      1793      G   /usr/bin/gnome-shell                         342MiB |
+-----------------------------------------------------------------------------+
- Please note I have
Processes running because my GPU is being used to run the X Window System including the
gnome-shell and Xorg.
When working with Deep Learning and GPU’s, inevitably, you will need a utility framework provided by NVIDIA called
NVIDIA CUDA Toolkit which provides a development environment for creating high performance GPU-accelerated applications.
CUDA is a tool written mostly in C++ and to use it, you will generally be writing in the same language. However,
Python libraries such as TensorFlow, Keras, and PyTorch have provided a wrapper Application Programming Interface
(API) where you can still use CUDA tensors and optimized operations to perform incredibly fast deep learning programming.
To install CUDA, you can either go to the thorough NVIDIA CUDA Installation Guide for Linux or just follow the steps below.
5.1 Downloading CUDA Installation Runfile
The first step we need to do is download the installation deb file from this
site. From here, select the appropriate options as per below:

Download the file by clicking the Download (1.6 GB) button. Ensure you download it to /home/user/Downloads.
We will be using the run file to avoid installing the NVIDIA driver again as part of this process.
5.2 Installing CUDA from the deb.
From here, we will need to logout of gdm3 again and repeat step (3) from when we installed the nVidia driver.
Press Ctl + Alt + F3 to use the virtual console tty3 and login:
  Ubuntu 18.04 SYSTEM-HOSTNAME tty3
  SYSTEM-HOSTNAME login: your-user-login
  Password: ********
  $ sudo service gdm3 stop
  $ sudo service --status-all | grep -i gdm3

  [ - ]  gdm3

  $ sudo init 3
Now that we have done this, we need to install the Debian package. These commands will ensure you do
not need to follow any prompts.
$ cd $HOME/Downloads/
$ sudo dpkg -i cuda-repo-ubuntu1804-10-0-local-10.0.130-410.48_1.0-1_amd64.deb
$ sudo apt-key add /var/cuda-repo-10-0-local-10.0.130-410.48/7fa2af80.pub
$ sudo apt update
$ sudo apt install cuda-toolkit-10-0
- Make sure you do not install the
cuda package as it will install the NVIDIA driver that will override the driver we installed previously.
The following details explain the meta-packages.
| Meta Package |
Purpose |
cuda |
Installs all CUDA Toolkit and Driver packages. Handles upgrading to the next version of the cuda package when it’s released. |
cuda-10-0 |
Installs all CUDA Toolkit and Driver packages. Remains at version 10.0 until an additional version of CUDA is installed. |
cuda-toolkit-10-0 |
Installs all CUDA Toolkit packages required to develop CUDA applications. Does not include the driver. |
cuda-tools-10-0 |
Installs all CUDA command line and visual tools. |
cuda-runtime-10-0 |
Installs all CUDA Toolkit packages required to run CUDA applications, as well as the Driver packages. |
cuda-compiler-10-0 |
Installs all CUDA compiler packages. |
cuda-libraries-10-0 |
Installs all runtime CUDA Library packages. |
cuda-libraries-dev-10-0 |
Installs all development CUDA Library packages. |
cuda-drivers |
Installs all Driver packages. Handles upgrading to the next version of the Driver packages when they’re released. |
5.3 Post-installation steps
To ensure the system knows where your CUDA installation is, you will need to add some environment variables to your
system. You can do this by adding these to your $HOME/.bashrc profile file.
$ echo '' >> $HOME/.bashrc
$ echo '##### CUDA INSTALLATION VARIABLES #####' >> $HOME/.bashrc
$ echo 'export CUDA_HOME=/usr/local/cuda' >> $HOME/.bashrc
$ echo 'export CUPTI=/usr/local/cuda/extras/CUPTI/lib64' >> $HOME/.bashrc
$ echo 'export CUDA_LD=/usr/local/cuda/lib64' >> $HOME/.bashrc
$ echo 'export CUDA_SAMPLES=$HOME/NVIDIA_CUDA-10.0_Samples/bin/x86_64/linux/release' >> $HOME/.bashrc
$ echo 'export LD_LIBRARY_PATH=$CUDA_LD:$CUPTI:$LD_LIBRARY_PATH' >> $HOME/.bashrc
$ echo 'export PATH=$CUDA/bin:$CUDA_SAMPLES:$PATH' >> $HOME/.bashrc
$ source $HOME/.bashrc
- I added the CUDA Samples variable also so you can easily run some of the samples later. After testing, you can
remove this line.
5.4 Testing the CUDA installation
Now that we have installed and setup environment variables for CUDA, we will test the installation by running some of
the samples that were installed with CUDA. Follow the following steps.
$ nvcc -V

nvcc: NVIDIA (R) Cuda compiler driver
Copyright (c) 2005-2018 NVIDIA Corporation
Built on Sat_Aug_25_21:08:01_CDT_2018
Cuda compilation tools, release 10.0, V10.0.130

$ cd $HOME/NVIDIA_CUDA-10.0_Samples
$ make -j4
$ deviceQuery

deviceQuery Starting...

 CUDA Device Query \(Runtime API\) version (CUDART static linking)

Detected 1 CUDA Capable device\(s\)

Device 0: "GeForce RTX 2080 Ti"
  CUDA Driver Version / Runtime Version          10.0 / 10.0
  CUDA Capability Major/Minor version number:    7.5
  Total amount of global memory:                 10989 MBytes (11523260416 bytes)
  (68) Multiprocessors, ( 64) CUDA Cores/MP:     4352 CUDA Cores
  GPU Max Clock rate:                            1560 MHz (1.56 GHz)
  Memory Clock rate:                             7000 Mhz
  Memory Bus Width:                              352-bit
  L2 Cache Size:                                 5767168 bytes
  Maximum Texture Dimension Size (x,y,z)         1D=(131072), 2D=(131072, 65536), 3D=(16384, 16384, 16384)
  Maximum Layered 1D Texture Size, (num) layers  1D=(32768), 2048 layers
  Maximum Layered 2D Texture Size, (num) layers  2D=(32768, 32768), 2048 layers
  Total amount of constant memory:               65536 bytes
  Total amount of shared memory per block:       49152 bytes
  Total number of registers available per block: 65536
  Warp size:                                     32
  Maximum number of threads per multiprocessor:  1024
  Maximum number of threads per block:           1024
  Max dimension size of a thread block (x,y,z): (1024, 1024, 64)
  Max dimension size of a grid size    (x,y,z): (2147483647, 65535, 65535)
  Maximum memory pitch:                          2147483647 bytes
  Texture alignment:                             512 bytes
  Concurrent copy and kernel execution:          Yes with 3 copy engine(s)
  Run time limit on kernels:                     Yes
  Integrated GPU sharing Host Memory:            No
  Support host page-locked memory mapping:       Yes
  Alignment requirement for Surfaces:            Yes
  Device has ECC support:                        Disabled
  Device supports Unified Addressing (UVA):      Yes
  Device supports Compute Preemption:            Yes
  Supports Cooperative Kernel Launch:            Yes
  Supports MultiDevice Co-op Kernel Launch:      Yes
  Device PCI Domain ID / Bus ID / location ID:   0 / 1 / 0
  Compute Mode:
     < Default (multiple host threads can use ::cudaSetDevice() with device simultaneously) >

deviceQuery, CUDA Driver = CUDART, CUDA Driver Version = 10.0, CUDA Runtime Version = 10.0, NumDevs = 1
Result = PASS
If you have correctly installed CUDA and setup the environment variables, running the above will give you a similar
output.
5.5 Installing cuDNN
The NVIDIA CUDA Depp Neural Network library (cuDNN) is a GPU-accelerated library that provides implementations of
standard routines such as forward and backward convolution, pooling, normalization, and activation layers. It is
often implemented as part of many deep learning frameworks such as Keras, MxNet, TensorFlow, and PyTorch.
To download cuDNN, you must sign in or create an NVIDIA Developer account. Then go to this
link and select Download cuDNN v7.4.2 (Dec 14, 2018), for CUDA
10.0. Download the following Debian package files to your $HOME/Downloads$ directory:
- cuDNN Runtime Library for Ubuntu18.04 (Deb)
- cuDNN Developer Library for Ubuntu18.04 (Deb)
- cuDNN Code Samples and User Guide for Ubuntu18.04 (Deb)
The installation guide provided by NVIDIA can also be found
here.
$ cd $HOME/Downloads/
$ sudo dpkg -i libcudnn7_7.4.1.5-1+cuda10.0_amd64.deb
$ sudo dpkg -i libcudnn7-dev_7.4.1.5-1+cuda10.0_amd64.deb
$ sudo dpkg -i libcudnn7-doc_7.4.1.5-1+cuda10.0_amd64.deb
5.6 Testing cuDNN Samples
At this point, you should have the cuDNN library installed. To test if the library works properly, we will use the
code samples provided in the deb file, extract it, compile it, and then run it. You should be currently in your
$HOME/Downloads directory if that’s where you downloaded the samples.
$ cp -r /usr/src/cudnn_samples_v7/ $HOME
$ cd $HOME/cudnn_samples_v7/mnistCUDNN
$ cd cudnn_samples_v7/mnistCUDNN
$ make clean && make
$ ./mnistCUDNN

cudnnGetVersion() : 7402 , CUDNN_VERSION from cudnn.h : 7402 (7.4.2)
Host compiler version : GCC 6.5.0
There are 1 CUDA capable devices on your machine :
device 0 : sms 68  Capabilities 7.5, SmClock 1560.0 Mhz, MemSize (Mb) 10989, MemClock 7000.0 Mhz, Ecc=0, boardGroupID=0
Using device 0

Testing single precision
Loading image data/one_28x28.pgm
Performing forward propagation ...
Testing cudnnGetConvolutionForwardAlgorithm ...
Fastest algorithm is Algo 0
Testing cudnnFindConvolutionForwardAlgorithm ...
^^^^ CUDNN_STATUS_SUCCESS for Algo 0: 0.016416 time requiring 0 memory
^^^^ CUDNN_STATUS_SUCCESS for Algo 1: 0.040928 time requiring 3464 memory
^^^^ CUDNN_STATUS_SUCCESS for Algo 2: 0.043040 time requiring 57600 memory
^^^^ CUDNN_STATUS_SUCCESS for Algo 7: 0.049152 time requiring 2057744 memory
^^^^ CUDNN_STATUS_SUCCESS for Algo 4: 0.057248 time requiring 207360 memory
Resulting weights from Softmax:
0.0000000 0.9999399 0.0000000 0.0000000 0.0000561 0.0000000 0.0000012 0.0000017 0.0000010 0.0000000
Loading image data/three_28x28.pgm
Performing forward propagation ...
Resulting weights from Softmax:
0.0000000 0.0000000 0.0000000 0.9999288 0.0000000 0.0000711 0.0000000 0.0000000 0.0000000 0.0000000
Loading image data/five_28x28.pgm
Performing forward propagation ...
Resulting weights from Softmax:
0.0000000 0.0000008 0.0000000 0.0000002 0.0000000 0.9999820 0.0000154 0.0000000 0.0000012 0.0000006

Result of classification: 1 3 5

Test passed!

Testing half precision (math in single precision)
Loading image data/one_28x28.pgm
Performing forward propagation ...
Testing cudnnGetConvolutionForwardAlgorithm ...
Fastest algorithm is Algo 0
Testing cudnnFindConvolutionForwardAlgorithm ...
^^^^ CUDNN_STATUS_SUCCESS for Algo 0: 0.016896 time requiring 0 memory
^^^^ CUDNN_STATUS_SUCCESS for Algo 2: 0.028736 time requiring 28800 memory
^^^^ CUDNN_STATUS_SUCCESS for Algo 1: 0.028992 time requiring 3464 memory
^^^^ CUDNN_STATUS_SUCCESS for Algo 7: 0.047456 time requiring 2057744 memory
^^^^ CUDNN_STATUS_SUCCESS for Algo 4: 0.049824 time requiring 207360 memory
Resulting weights from Softmax:
0.0000001 1.0000000 0.0000001 0.0000000 0.0000563 0.0000001 0.0000012 0.0000017 0.0000010 0.0000001
Loading image data/three_28x28.pgm
Performing forward propagation ...
Resulting weights from Softmax:
0.0000000 0.0000000 0.0000000 1.0000000 0.0000000 0.0000714 0.0000000 0.0000000 0.0000000 0.0000000
Loading image data/five_28x28.pgm
Performing forward propagation ...
Resulting weights from Softmax:
0.0000000 0.0000008 0.0000000 0.0000002 0.0000000 1.0000000 0.0000154 0.0000000 0.0000012 0.0000006

Result of classification: 1 3 5

Test passed!
That’s all for this part of the series. Next up will be Part 2: Development Environment, Frameworks, and IDE
Installation which will look at setting up your Anaconda Virtual Environment, Jupyter Lab (optional), PyCharm IDE
(optional), and installing OpenCV, Keras, TensorFlow, PyTorch, and MxNet.