Intel MKL for Machine Learning
21 Feb 2019So recently I have been playing around with my Deep Learning environments trying to optimise the BLAS (Basic Linear Algebra Subprograms) libraries as much as possible since I plan on using it for computer vision ML models that require efficient computations as images are extracted from video streams. That’s when I first came across the Intel Math Kernel Library (MKL) that can be used to improve the efficiency of numpy, scipy, tensorflow, and opencv. Additionally, reading this post helped me better understand how boosting BLAS was going to help with my deep learning models.
One of the first things you are going to need to do is register for a student account with Intel so you can download the Intel Parallel Studio XE pack. If you aren’t a student, you can still download Intel MKL as they have made it free. The only difference between these two packages is that Parallel Studio XE will allow you to install other optimised libraries such as OpenMP, TBB, and IPP.
Pre-installation Steps
Firstly, my system has an NVIDIA 2080 Ti. I have already installed CUDA 10.0 with TensorRT 5.0.2 and cuDNN 7.4.2. If you have not done this, read my post from 27.12.2018 to install them.
Additionally, other packages you might need for OpenCV to work best, you can install the following:
$ sudo apt update
$ sudo apt install build-essential cmake unzip pkg-config pylint \
libjpeg-dev libpng-dev libtiff-dev libavcodec-dev libavformat-dev \
libdc1394-22-dev libx264-dev libswscale-dev libv4l-dev \
libxvidcore-dev libx264-dev libeigen3-dev gfortran \
libhdf5-serial-dev python3-dev python3-tk python-imaging-tk \
ubuntu-restricted-extras libgtk-3-dev libgstreamer1.0-dev \
libgstreamer-plugins-base1.0-dev libavresample-dev libgflags2.2 \
libgflags-dev libgoogle-glog-dev
Another dependency required by OpenCV that is not available in the aptrepository with Ubuntu 18.04 is libjasper. To install, follow these manual steps:
$ wget http://security.ubuntu.com/ubuntu/pool/main/j/jasper/libjasper-dev_1.900.1-debian1-2.4ubuntu1.2_amd64.deb
$ wget http://security.ubuntu.com/ubuntu/pool/main/j/jasper/libjasper1_1.900.1-debian1-2.4ubuntu1.2_amd64.deb
$ sudo apt-get install ./libjasper1_1.900.1-debian1-2.4ubuntu1.2_amd64.deb \
  ./libjasper-dev_1.900.1-debian1-2.4ubuntu1.2_amd64.deb
Finally, there is another package we can install from Google developers that will support protocol buffers. We will do this from source to control our package.
$ sudo apt install -y autoconf automake libtool curl make g++ unzip
$ git clone https://github.com/google/protobuf.git
$ cd protobuf && git checkout v3.6.1
$ git submodule update --init --recursive
$ ./autogen.sh
$ ./configure
$ make -j$(nproc)
$ make -j$(nproc) check
$ sudo make install
$ sudo ldconfig
$ protoc --version
libprotoc 3.6.1
Install Intel MKL and (Optionally) Other Libraries
Once you have downloaded Intel Parallel Studio XE (it will take some time as it is a big ~4 GB file), you should create a folder to keep all these library source files. Unfortunately, as I have been testing the Intel MKL packages lately, I have been unable to make the new 2019.3 version to work with OpenCV 4.0.1 or 3.4.5. As a result, we are going to download the 2018 Update 4 version. Please ensure you do so as it may not work for you either. If you do manage to get the 2019 update to work, please send me an email as I would very much appreciate some help.
Download or move to this deep_learning_env directory and then do the following.
$ mkdir $HOME/deep_learning_env & cd deep_learning_env
$ tar -xzf parallel_studio_xe_2018_update4_cluster_edition.tgz
$ cd parallel_studio_xe_2018_update4_cluster_edition/
$ sudo ./install_GUI.sh
The GUI installation process will begin. Firstly accept the license agreement and decent if you want to join the Intel Software Improvement Program. After this you will enter your serial number that you received when you registered and downloaded the Intel Parallel Studio XE 2018 Update 4 Cluster Edition for Linux package.
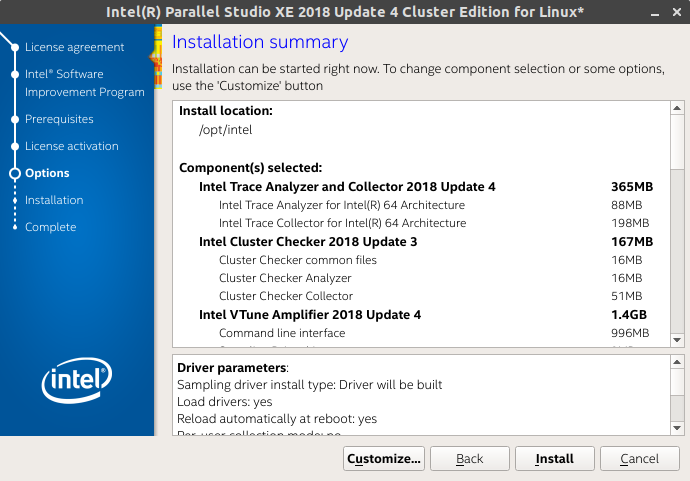
After you have completed these stages, you will get to a screen like this. Ensure you select Customize…

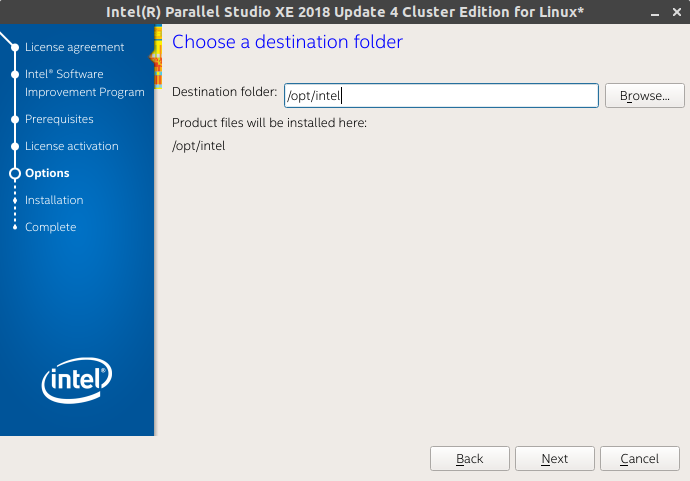
From here, you will install it. You can safely leave it as default to install in /opt/intel.

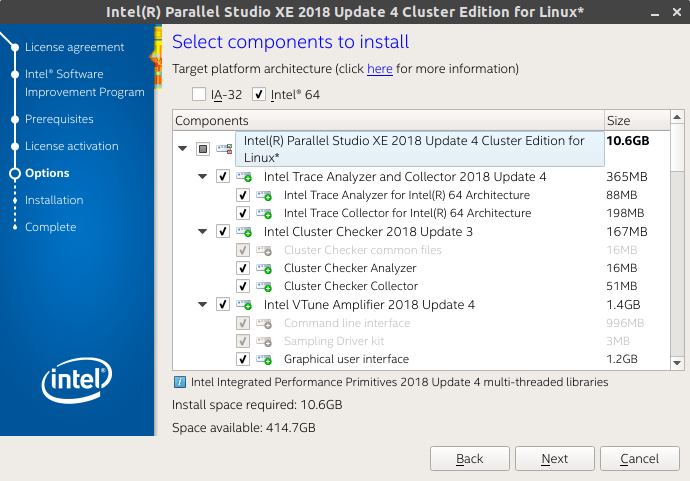
Finally, here is where you select the packages you will need.

I generally left it as it is and installed the following (note: I have marked the important ones as **. You may not need to install the others):
Intel VTune Amplifier 2018 Update 4 **
Intel Inspector 2018 Update 4
Intel Advisor 2018 Update 4
Intel C++ Compiler 18.0 Update 5 **
Intel Fortran Compuler 18.0 Update 5 **
Intel Math Kernel Library 2018 Update 4 for C/C++ **
Intel Math Kernel Library 2018 Update 4 for Fortran **
Intel Integrated Performance Primitives 2018 Update 4 **
Intel Threading Building Blocks 2018 Update 6
Intel Data Analytics Acceleration Library 2018 Update 3
Intel MPI Library 2018 Update 4
GNU GDB 7.12
Once that has finished installing, you will need to set the variables using a script provided by the installation.
$ source /opt/intel/bin/compilervars.sh -arch intel64 -platform linux
$ echo $LD_LIBRARY_PATH
/opt/intel/compilers_and_libraries_2018.5.274/linux/compiler/lib/intel64:/opt/intel/compilers_and_libraries_2018.5.274/linux/compiler/lib/intel64_lin:/opt/intel/compilers_and_libraries_2018.5.274/linux/mpi/intel64/lib:/opt/intel/compilers_and_libraries_2018.5.274/linux/mpi/mic/lib:/opt/intel/compilers_and_libraries_2018.5.274/linux/ipp/lib/intel64:/opt/intel/compilers_and_libraries_2018.5.274/linux/compiler/lib/intel64_lin:/opt/intel/compilers_and_libraries_2018.5.274/linux/mkl/lib/intel64_lin:/opt/intel/compilers_and_libraries_2018.5.274/linux/tbb/lib/intel64/gcc4.7:/opt/intel/compilers_and_libraries_2018.5.274/linux/tbb/lib/intel64/gcc4.7:/opt/intel/debugger_2018/libipt/intel64/lib:/opt/intel/compilers_and_libraries_2018.5.274/linux/daal/lib/intel64_lin:/opt/intel/compilers_and_libraries_2018.5.274/linux/daal/../tbb/lib/intel64_lin/gcc4.4:/opt/intel/compilers_and_libraries/linux/mkl/lib/intel64:/opt/intel/compilers_and_libraries/linux/lib/intel64:/usr/local/cuda/lib64:/usr/local/cuda/extras/CUPTI/lib64:

$ echo $CPATH
/opt/intel/compilers_and_libraries_2018.5.274/linux/ipp/include:/opt/intel/compilers_and_libraries_2018.5.274/linux/mkl/include:/opt/intel/compilers_and_libraries_2018.5.274/linux/pstl/include:/opt/intel/compilers_and_libraries_2018.5.274/linux/tbb/include:/opt/intel/compilers_and_libraries_2018.5.274/linux/tbb/include:/opt/intel/compilers_and_libraries_2018.5.274/linux/daal/include
If you do not see the above in your LD_LIBRARY_PATH then there is a major issue and you may need to install again. Please note yours may be fewer in output because you may not have installed as many packages.
Using the Intel Distribution for Python
While it is fine to accelerate most data science libraries with just Intel MKL, to help achieve even faster performance on Intel chipsets, you can use the Intel Distribution for Python which can help even further with your optimisations. As I mentioned earlier, we have already installed it with our Intel Parallel Studio XE package.
I will probably make another post with this same build process using the Intel Distribution for Python version. However, for the mean time, I will just use the system Python that ships with Ubuntu 18.04.
$ which python3
/usr/bin/python3

$ python3 --version
Python 3.6.7
Using the Intel Distribution for Python with Conda
$ conda create -n intel_dl4cv intelpython python=3 -c intel
Collecting package metadata: done
Solving environment: done

## Package Plan ##

  environment location: /home/codeninja/anaconda3/envs/intel_dl4cv

  added / updated specs:
    - intelpython
    - python=3


The following packages will be downloaded:

    package                    |            build
    ---------------------------|-----------------
    bzip2-1.0.6                |               17          97 KB  intel
    certifi-2018.1.18          |           py36_2         143 KB  intel
    intelpython-2019.2         |                0           3 KB  intel
    openssl-1.0.2p             |                0         2.0 MB  intel
    pip-9.0.3                  |           py36_1         1.9 MB  intel
    python-3.6.8               |                0        24.3 MB  intel
    setuptools-39.0.1          |           py36_0         726 KB  intel
    sqlite-3.23.1              |                1         1.3 MB  intel
    tcl-8.6.4                  |               20         1.3 MB  intel
    tk-8.6.4                   |               28         1.1 MB  intel
    wheel-0.31.0               |           py36_3          62 KB  intel
    xz-5.2.3                   |                2         173 KB  intel
    zlib-1.2.11                |                5          95 KB  intel
    ------------------------------------------------------------
                                           Total:        33.2 MB
Installing Numpy and Scipy with Intel MKL
https://software.intel.com/en-us/articles/numpyscipy-with-intel-mkl
$ git clone https://github.com/numpy/numpy.git
$ git clone https://github.com/scipy/scipy.git
$ cd numpy && git checkout v1.16.1
$ cd ../scipy && git checkout v1.2.1
Numpy
NOTE: A recent bug that I have noticed when I previously installed numpy was an issue to do with using the Intel Fortran compiler after numpy had been installed and then trying to install scipy. This issue was noted here #10569 and then fixed #12831. As noted at the end of this, numpy version v1.16.0rc1 introduced this issue so we have we will use the latest release and apply the manual fix ourselves.
$ cd $HOME/deep_learning_env/numpy
$ nano numpy/distutils/ccompiler.py
Fix the following line to look like this:
...

try:
        output = subprocess.check_output(version_cmd, stderr=subprocess.STDOUT)

...
In addition to that, we will add some C/C++ compiler flags in this file numpy/distutils/intelccompiler.py that Intel has suggested from this tutorial. Note, we are really only adding -xhost to the following line self.cc_exe = ('icc -m64 -fPIC -fp-model strict -O3 -fomit-frame-pointer -xhost -{}').format(mpopt) for the IntelEM64TCCompiler as can be seen below
class IntelEM64TCCompiler(UnixCCompiler):
    """
    A modified Intel x86_64 compiler compatible with a 64bit GCC-built Python.
    """
    compiler_type = 'intelem'
    cc_exe = 'icc -m64'
    cc_args = '-fPIC'

    def __init__(self, verbose=0, dry_run=0, force=0):
        UnixCCompiler.__init__(self, verbose, dry_run, force)

        v = self.get_version()
        mpopt = 'openmp' if v and v < '15' else 'qopenmp'
        self.cc_exe = ('icc -m64 -fPIC -fp-model strict -O3 '
                       '-fomit-frame-pointer -{}').format(mpopt)
        compiler = self.cc_exe
Finally, we are going to add the following to numpy/distutils/fcompiler/intel.py for the Intel Fortran compiler flags. Again, we are only adding -xhost to this line return ['-xhost -fp-model strict -fPIC -{}'.format(mpopt)] for the IntelFCompiler as can be seen below:
class IntelFCompiler(BaseIntelFCompiler):

    compiler_type = 'intel'
    compiler_aliases = ('ifort',)
    description = 'Intel Fortran Compiler for 32-bit apps'
    version_match = intel_version_match('32-bit|IA-32')

    possible_executables = ['ifort', 'ifc']

    executables = {
        'version_cmd'  : None,          # set by update_executables
        'compiler_f77' : [None, "-72", "-w90", "-w95"],
        'compiler_f90' : [None],
        'compiler_fix' : [None, "-FI"],
        'linker_so'    : ["<F90>", "-shared"],
        'archiver'     : ["ar", "-cr"],
        'ranlib'       : ["ranlib"]
        }

    pic_flags = ['-fPIC']
    module_dir_switch = '-module '  # Don't remove ending space!
    module_include_switch = '-I'

    def get_flags_free(self):
        return ['-FR']

    def get_flags(self):
        return ['-fPIC']

    def get_flags_opt(self):  # Scipy test failures with -O2
        v = self.get_version()
        mpopt = 'openmp' if v and v < '15' else 'qopenmp'
        return ['-xhost -fp-model strict -O1 -{}'.format(mpopt)]
Now we can setup to compile numpy:
$ cp site.cfg.example site.cfg
$ nano site.cfg
Uncomment the following lines in the file the following assuming your installation path of Intel MKL is at /opt/intel/compilers_and_libraries_2018/linux:
# MKL
#----
# Intel MKL is Intel's very optimized yet proprietary implementation of BLAS and
# Lapack. Find the latest info on building numpy with Intel MKL in this article:
# https://software.intel.com/en-us/articles/numpyscipy-with-intel-mkl
# Assuming you installed the mkl in /opt/intel/compilers_and_libraries_2018/linux/mkl,
# for 64 bits code at Linux:

[mkl]
library_dirs = /opt/intel/compilers_and_libraries_2018/linux/mkl/lib/intel64
include_dirs = /opt/intel/compilers_and_libraries_2018/linux/mkl/include
mkl_libs = mkl_rt
lapack_libs =
Finally, we are going to build our numpy installation:
$ python3 setup.py config --compiler=intelem build_clib --compiler=intelem build_ext --compiler=intelem install --user
To test if you have installed it correctly linked with Intel MKL, use the following:
$ cd ~/
$ python3 -c "import numpy as np; np.__config__.show()"
blas_mkl_info:
    libraries = ['mkl_rt', 'pthread']
    library_dirs = ['/opt/intel/compilers_and_libraries_2018/linux/mkl/lib/intel64']
    define_macros = [('SCIPY_MKL_H', None), ('HAVE_CBLAS', None)]
    include_dirs = ['/opt/intel/compilers_and_libraries_2018.5.274/linux/mkl', '/opt/intel/compilers_and_libraries_2018.5.274/linux/mkl/include', '/opt/intel/compilers_and_libraries_2018.5.274/linux/mkl/lib', '/opt/intel/compilers_and_libraries_2018/linux/mkl/include']
blas_opt_info:
    libraries = ['mkl_rt', 'pthread']
    library_dirs = ['/opt/intel/compilers_and_libraries_2018/linux/mkl/lib/intel64']
    define_macros = [('SCIPY_MKL_H', None), ('HAVE_CBLAS', None)]
    include_dirs = ['/opt/intel/compilers_and_libraries_2018.5.274/linux/mkl', '/opt/intel/compilers_and_libraries_2018.5.274/linux/mkl/include', '/opt/intel/compilers_and_libraries_2018.5.274/linux/mkl/lib', '/opt/intel/compilers_and_libraries_2018/linux/mkl/include']
lapack_mkl_info:
    libraries = ['mkl_rt', 'pthread']
    library_dirs = ['/opt/intel/compilers_and_libraries_2018/linux/mkl/lib/intel64']
    define_macros = [('SCIPY_MKL_H', None), ('HAVE_CBLAS', None)]
    include_dirs = ['/opt/intel/compilers_and_libraries_2018.5.274/linux/mkl', '/opt/intel/compilers_and_libraries_2018.5.274/linux/mkl/include', '/opt/intel/compilers_and_libraries_2018.5.274/linux/mkl/lib', '/opt/intel/compilers_and_libraries_2018/linux/mkl/include']
lapack_opt_info:
    libraries = ['mkl_rt', 'pthread']
    library_dirs = ['/opt/intel/compilers_and_libraries_2018/linux/mkl/lib/intel64']
    define_macros = [('SCIPY_MKL_H', None), ('HAVE_CBLAS', None)]
    include_dirs = ['/opt/intel/compilers_and_libraries_2018.5.274/linux/mkl', '/opt/intel/compilers_and_libraries_2018.5.274/linux/mkl/include', '/opt/intel/compilers_and_libraries_2018.5.274/linux/mkl/lib', '/opt/intel/compilers_and_libraries_2018/linux/mkl/include']
Scipy
The installation for scipy is a little simpler as we are not required to fix any issues. However, if you get errors during this process, it is likely you did not compile numpy properly.
$ cd $HOME/deep_learning_env/scipy
$ python3 setup.py config --compiler=intelem --fcompiler=intelem build_clib --compiler=intelem --fcompiler=intelem build_ext --compiler=intelem --fcompiler=intelem install --user
Let’s just do a quick test.
$ cd ~/
# pip3 install pytest
$ python3
Python 3.6.7 (default, Oct 22 2018, 11:32:17)
[GCC 8.2.0] on linux
Type "help", "copyright", "credits" or "license" for more information.
>>> import scipy as sp
>>> sp.test(verbose=3)
================= test session starts ===============================
platform linux -- Python 3.6.7, pytest-4.3.0, py-1.7.0, pluggy-0.8.1 -- /usr/bin/python3
cachedir: .pytest_cache
rootdir: /home/codeninja/deep_learning_env/scipy, inifile: pytest.ini
collected 16700 items / 1223 deselected / 15477 selected
After all this is done, we are just going to add the following to our environment variables in $HOME/.bashrc.
##### INTEL MKL ######
export INTEL_COMPILERS_AND_LIBS=/opt/intel/compilers_and_libraries_2018/linux
export LD_LIBRARY_PATH=$INTEL_COMPILERS_AND_LIBS/mkl/lib/intel64:$INTEL_COMPILERS_AND_LIBS/lib/intel64:$LD_LIBRARY_PATH
export PATH=/opt/intel/bin:$PATH
Installing OpenCV 4 from source with Intel MKL
$ mkdir opencv_install && cd opencv_install
$ git clone https://github.com/opencv/opencv.git
$ git clone https://github.com/opencv/opencv_contrib.git
$ cd opencv; git checkout 4.0.1
$ cd ../opencv_contrib; git checkout 4.0.1
$ cd .. && nano xcmake.sh
Add the following to the file, assuming you have followed the steps from above as some of these will use specific library path setting:
#!/bin/bash

WHERE_OPENCV=../opencv
WHERE_OPENCV_CONTRIB=../opencv_contrib
# Run this first
# export LD_PRELOAD=/opt/intel/compilers_and_libraries_2018/linux/mkl/lib/intel64/libmkl_core.so

cmake -D CMAKE_BUILD_TYPE=RELEASE \
      -D CMAKE_INSTALL_PREFIX=/usr/local \
      -D PYTHON3_EXECUTABLE=/usr/bin/python3.6 \
      -D BUILD_OPENCV_PYTHON3=ON \
      -D INSTALL_C_EXAMPLES=ON \
      -D INSTALL_PYTHON_EXAMPLES=ON \
      -D WITH_STREAMER=ON \
      -D WITH_CUDA=ON \
      -D BUILD_opencv_gpu=ON \
      -D WITH_CUBLAS=1 \
      -D CUDA_FAST_MATH=1 \
      -D ENABLE_FAST_MATH=1 \
      -D WITH_IPP=ON \
      -D IPPROOT=/opt/intel/compilers_and_libraries_2018/linux/ipp \
      -D WITH_TBB=OFF \
      -D WITH_OPENMP=OFF \
      -D BUILD_PERF_TESTS=OFF \
      -D WITH_OPENCL=ON \
      -D WITH_OPENGL=ON \
      -D BUILD_opencv_dnn=OFF \
      -D BUILD_opencv_cudacodec=OFF \
      -D OPENCV_ENABLE_NONFREE=ON \
      -D WITH_PROTOBUF=ON \
      -D BUILD_PROTOBUF=OFF \
      -D PROTOBUF_INCLUDE_DIR=/usr/local/include \
      -D PROTOBUF_LIBRARY=/usr/local/lib/libprotobuf.so \
      -D PROTOBUF_LIBRARY_DEBUG=/usr/local/lib/libprotobuf.so \
      -D PROTOBUF_LITE_LIBRARY=/usr/local/lib/libprotobuf-lite.so \
      -D PROTOBUF_LITE_LIBRARY_DEBUG=/usr/local/lib/libprotobuf-lite.so \
      -D PROTOBUF_PROTOC_EXECUTABLE=/usr/local/bin/protoc \
      -D PROTOBUF_PROTOC_LIBRARY=/usr/local/lib/libprotoc.so \
      -D PROTOBUF_PROTOC_LIBRARY_DEBUG=/usr/local/lib/libprotoc.so \
      -D OPENCV_EXTRA_MODULES_PATH=$WHERE_OPENCV_CONTRIB/modules \
      -D BUILD_EXAMPLES=ON $WHERE_OPENCV
Then we are going to setup make files in a separate build directory:
$ sudo chmod u+x xcmake.sh
$ mkdir build && cd build
$ ../xcmake.sh
If you see the following then you are set to go:
--   Parallel framework:            pthreads
--
--   Trace:                         YES (with Intel ITT)
--
--   Other third-party libraries:
--     Intel IPP:                   2018.0.4 [2018.0.4]
--            at:                   /opt/intel/compilers_and_libraries_2018/linux/ipp
--        linked:                   static
--     Intel IPP IW:                sources (2019.0.0)
--               at:                /home/codeninja/deep_learning_env/ocv_install/build/3rdparty/ippicv/ippicv_lnx/iw/
--     Lapack:                      YES (/opt/intel/compilers_and_libraries_2018.5.274/linux/mkl/lib/intel64/libmkl_intel_lp64.so /opt/intel/compilers_and_libraries_2018.5.274/linux/mkl/lib/intel64/libmkl_sequential.so /opt/intel/compilers_and_libraries_2018.5.274/linux/mkl/lib/intel64/libmkl_core.so /opt/intel/compilers_and_libraries_2018.5.274/linux/mkl/lib/intel64/libmkl_intel_lp64.so /opt/intel/compilers_and_libraries_2018.5.274/linux/mkl/lib/intel64/libmkl_sequential.so /opt/intel/compilers_and_libraries_2018.5.274/linux/mkl/lib/intel64/libmkl_core.so /opt/intel/compilers_and_libraries_2018.5.274/linux/mkl/lib/intel64/libmkl_intel_lp64.so /opt/intel/compilers_and_libraries_2018.5.274/linux/mkl/lib/intel64/libmkl_sequential.so /opt/intel/compilers_and_libraries_2018.5.274/linux/mkl/lib/intel64/libmkl_core.so -lpthread -lm -ldl)
--     Eigen:                       YES (ver 3.3.4)
--     Custom HAL:                  NO
--     Protobuf:                    /usr/local/lib/libprotobuf.so (3.6.1)
--
--   NVIDIA CUDA:                   YES (ver 10.0, CUFFT CUBLAS NVCUVID FAST_MATH)
--     NVIDIA GPU arch:             30 35 37 50 52 60 61 70 75
--     NVIDIA PTX archs:
--
--   OpenCL:                        YES (no extra features)
--     Include path:                /home/codeninja/deep_learning_env/ocv_install/opencv/3rdparty/include/opencl/1.2
--     Link libraries:              Dynamic load
--
--   Python 3:
--     Interpreter:                 /usr/bin/python3.6 (ver 3.6.7)
--     Libraries:                   /usr/lib/x86_64-linux-gnu/libpython3.6m.so (ver 3.6.7)
--     numpy:                       /home/codeninja/.local/lib/python3.6/site-packages/numpy-1.16.1-py3.6-linux-x86_64.egg/numpy/core/include (ver 1.16.1)
--     install path:                lib/python3.6/dist-packages/cv2/python-3.6
--
--   Python (for build):            /usr/bin/python2.7
--     Pylint:                      /usr/bin/pylint (ver: 1.8.3, checks: 168)
--     Flake8:                      /usr/bin/flake8 (ver: 3.5.0)
--
--   Java:
--     ant:                         NO
--     JNI:                         /usr/lib/jvm/default-java/include /usr/lib/jvm/default-java/include/linux /usr/lib/jvm/default-java/include
--     Java wrappers:               NO
--     Java tests:                  NO
--
--   Install to:                    /usr/local
-- -----------------------------------------------------------------
--
-- Configuring done
Once that is all good, let’s go ahead and do the install:
$ make -j$(nproc) && sudo make install
$ sudo ldconfig
$ pkg-config --modversion opencv
4.0.1